
文章目录
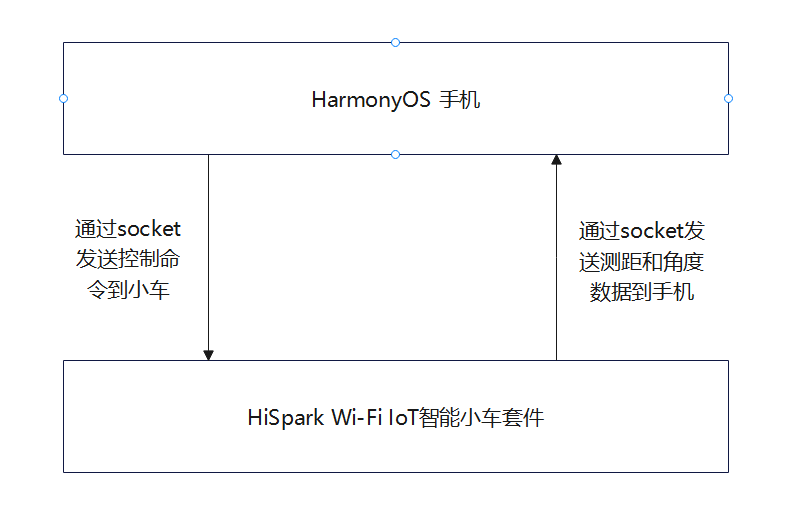
- ①.本项目采用的开发套件为HiSpark Wi-Fi IoT智能小车。 ②.项目预览。 视频链接:https://www.bilibili.com/video/BV1pS4y1Y72j/。 代码开源地址:https://gitee.com/yukoyu/harmony-wifi-car。 ③.框架图 ④.HarmonyOS采用 JAVA方式开发
- ①.新建文件夹。 路径:openharmony\applications\sample\wifi-iot\app\ mkdir wificar ②.编写小车电机驱动。 路径:openharmony\applications\sample\wifi-iot\app\wificar\robot_l9110s.c 代码: #define GPIO0 0#define GPIO1 1#define GPIO9 9#define GPIO10 10#define GPIOFUNC 0#define PWM_FREQ_FREQUENCY (60000)void gpio_control (unsigned int gpio, IotGpioValue value) { hi_io_set_func(gpio, GPIOFUNC); IoTGpioSetDir(gpio, IOT_GPIO_DIR_OUT); IoTGpioSetOutputVal(gpio, value);}//后退void car_backward(void) { gpio_control(GPIO0, IOT_GPIO_VALUE0); gpio_control(GPIO1, IOT_GPIO_VALUE1); gpio_control(GPIO9, IOT_GPIO_VALUE0); gpio_control(GPIO10, IOT_GPIO_VALUE1);}//前进void car_forward(void) { gpio_control(GPIO0, IOT_GPIO_VALUE1); gpio_control(GPIO1, IOT_GPIO_VALUE0); gpio_control(GPIO9, IOT_GPIO_VALUE1); gpio_control(GPIO10, IOT_GPIO_VALUE0);}//左转void car_left(void) { gpio_control(GPIO0, IOT_GPIO_VALUE0); gpio_control(GPIO1, IOT_GPIO_VALUE0); gpio_control(GPIO9, IOT_GPIO_VALUE1); gpio_control(GPIO10, IOT_GPIO_VALUE0);}//右转void car_right(void) { gpio_control(GPIO0, IOT_GPIO_VALUE1); gpio_control(GPIO1, IOT_GPIO_VALUE0); gpio_control(GPIO9, IOT_GPIO_VALUE0); gpio_control(GPIO10, IOT_GPIO_VALUE0);}//停止转动void car_stop(void) { gpio_control(GPIO0, IOT_GPIO_VALUE1); gpio_control(GPIO1, IOT_GPIO_VALUE1); gpio_control(GPIO9, IOT_GPIO_VALUE1); gpio_control(GPIO10, IOT_GPIO_VALUE1);} ③.编写舵机驱动。 路径:openharmony\applications\sample\wifi-iot\app\wificar\robot_sg90.c 代码: #define GPIO2 2void set_angle( unsigned int duty) { IoTGpioInit(GPIO2); IoTGpioSetDir(GPIO2, IOT_GPIO_DIR_OUT); IoTGpioSetOutputVal(GPIO2, IOT_GPIO_VALUE1); hi_udelay(duty); IoTGpioSetOutputVal(GPIO2, IOT_GPIO_VALUE0); hi_udelay(20000 - duty);}//控制电机转动角度 参数范围 1000<time<2000void custom(int time){ for (int i = 0; i <10; i++) { set_angle(time); }} ④.编写超声波驱动。 路径:openharmony\applications\sample\wifi-iot\app\wificar\robot_hcsr04.c 代码: #define GPIO_8 8#define GPIO_7 7#define GPIO_FUNC 0extern int cmm;void GetDistance (float *distance) { static unsigned long start_time = 0, time = 0; IotGpioValue value = IOT_GPIO_VALUE0; unsigned int flag = 0; IoTWatchDogDisable(); hi_io_set_func(GPIO_8, GPIO_FUNC); IoTGpioSetDir(GPIO_8, IOT_GPIO_DIR_IN); IoTGpioSetDir(GPIO_7, IOT_GPIO_DIR_OUT); IoTGpioSetOutputVal(GPIO_7, IOT_GPIO_VALUE1); hi_udelay(20); IoTGpioSetOutputVal(GPIO_7, IOT_GPIO_VALUE0); while (1) { IoTGpioGetInputVal(GPIO_8, &value); if ( value == IOT_GPIO_VALUE1 && flag == 0) start_time = hi_get_us(); flag = 1; } if (value == IOT_GPIO_VALUE0 && flag == 1) { time = hi_get_us() - start_time; start_time = 0; break; } } *distance = time * 0.034 / 2; printf("distance is %f\r\n",*distance); return ;} ⑤.编写wifi和socket server。 路径:openharmony\applications\sample\wifi-iot\app\wificar\wifi_sockets.c 代码: // 接收、发送的数据static char request[256] = "";// 未连接热点=0,已连接热点=1static int g_connected = 0;int connfd = -1;// 输出连接信息字符串// 打印内容样例--> bssid: 38:47:BC:49:01:FA, rssi: 0, connState: 0, reason: 0, ssid: MyMobilevoid PrintLinkedInfo(WifiLinkedInfo* info) { if (!info) return; static char macAddress[32] = {0}; unsigned char* mac = info->bssid; snprintf(macAddress, sizeof(macAddress), "%02X:%02X:%02X:%02X:%02X:%02X", mac[0], mac[1], mac[2], mac[3], mac[4], mac[5]); printf("bssid: %s, rssi: %d, connState: %d, reason: %d, ssid: %srn", macAddress, info->rssi, info->connState, info->disconnectedReason, info->ssid);}// 连接状态改变事件处理void OnWifiConnectionChanged(int state, WifiLinkedInfo* info) { if (!info) return; // 输出类似内容:OnWifiConnectionChanged 31, state = 1, info = printf("%s %d, state = %d, info = rn", __FUNCTION__, __LINE__, state); PrintLinkedInfo(info); // 根据连接状态设置g_connected if (state == WIFI_STATE_AVALIABLE) { g_connected = 1; } else { g_connected = 0; }}// 扫描状态改变事件处理void OnWifiScanStateChanged(int state, int size) { printf("%s %d, state = %X, size = %drn", __FUNCTION__, __LINE__, state, size);}void DisconnectTcpSocket(int connfd) { sleep(1); printf("do_disconnect...rn"); lwip_close(connfd); sleep(1); // for debug}void CloseTcpSocket(int socketfd) { printf("do_cleanup...rn"); lwip_close(socketfd);}static void TcpServerHandler(void) { ssize_t retval = 0; unsigned short port = 20222; // 创建一个通信的Socket,并返回一个Socket文件描述符。第一个参数IpV4,第二个参数SOCK_STREAM类型,第三个指用到的协议 int sockfd = socket(AF_INET, SOCK_STREAM, 0); // 客户端地址和地址长度 struct sockaddr_in clientAddr = {0}; socklen_t clientAddrLen = sizeof(clientAddr); // 服务端地址 struct sockaddr_in serverAddr = {0}; serverAddr.sin_family = AF_INET; // htons是将整型变量从主机字节顺序转变成网络字节顺序,就是整数在地址空间存储方式变为高位字节存放在内存的低地址处 serverAddr.sin_port = htons(port); // 监听本机的所有IP地址,INADDR_ANY=0x0 // 将主机数转换成无符号长整型的网络字节顺序 serverAddr.sin_addr.s_addr = htonl(INADDR_ANY); // 服务端绑定端口 retval = bind(sockfd, (struct sockaddr *)&serverAddr, sizeof(serverAddr)); if (retval < 0) { printf("bind failed, %ld!rn", retval); CloseTcpSocket(sockfd); return; } printf("bind to port %d success!rn", port); // 开始监听,backlog指Pending连接队列增长到的最大长度。队列满了,再有新连接请求到达,则客户端ECONNREFUSED错误。如果支持重传,则请求忽略。 int backlog = 1; retval = listen(sockfd, backlog); if (retval < 0) { printf("listen failed!rn"); CloseTcpSocket(sockfd); return; } printf("listen with %d backlog success!rn", backlog); int outerFlag = 1; while (outerFlag) { // 接受客户端连接,成功会返回一个表示连接的 socket。clientAddr参数将会携带客户端主机和端口信息;失败返回 -1 // 从Pending连接队列中获取第一个连接,根据sockfd的socket协议、地址族等内容创建一个新的socket文件描述,并返回。 // 此后的 收、发 都在 表示连接的 socket 上进行;之后 sockfd 依然可以继续接受其他客户端的连接, // UNIX系统上经典的并发模型是“每个连接一个进程”——创建子进程处理连接,父进程继续接受其他客户端的连接 // 鸿蒙liteos-a内核之上,可以使用UNIX的“每个连接一个进程”的并发模型liteos-m内核之上,可以使用“每个连接一个线程”的并发模型 connfd = accept(sockfd, (struct sockaddr *)&clientAddr, &clientAddrLen); if (connfd < 0) { printf("accept failed, %d, %drn", connfd, errno); CloseTcpSocket(sockfd); //outerFlag = 0; } printf("accept success, connfd = %d !rn", connfd); // inet_ntoa:网络地址转换成“.”点隔的字符串格式。ntohs:16位数由网络字节顺序转换为主机字节顺序。 printf("client addr info: host = %s, port = %drn", inet_ntoa(clientAddr.sin_addr), ntohs(clientAddr.sin_port)); int innerFlag = 1; // 接收消息,然后发送回去 while (innerFlag) { // 后续 收、发 都在 表示连接的 socket 上进行; // 在新的Socket文件描述上接收信息. retval = recv(connfd, request, sizeof(request), 0); if (retval < 0) { printf("recv request failed, %ld!rn", retval); innerFlag = 0; } else if (retval == 0) { // 对方主动断开连接 printf("client disconnected!rn"); innerFlag = 0; } else { //printf("recv request{%s} from client done!rn", request); // 发送数据 printf("cc = %d %d %d \r\n",request[0],request[1],request[2]); if (retval <= 0) { printf("send response failed, %ld!rn", retval); innerFlag = 0; } if(retval == 3 && request[0] == -86) { if(request[1] = 0x00){ retval = send(connfd, "aaok", strlen("aaok"), 0); } if(request[1] = 0x01) { switch (request[2]) { case 1: car_forward();break; case 2: car_right();break; case 3: car_backward();break; case 4: car_left();break; case 0: car_stop();break; } } } //printf("send response{%s} to client done!rn", request); // 清空缓冲区 memset(&request, 0, sizeof(request)); } if(innerFlag == 0) { DisconnectTcpSocket(connfd); //outerFlag = 0; } } CloseTcpSocket(sockfd); }}void *TcpServerTask(void *arg) { (void)arg; // 先定义两个Wifi监听器,一个连接改变、一个状态改变 WifiEvent eventListener = { .OnWifiConnectionChanged = OnWifiConnectionChanged, .OnWifiScanStateChanged = OnWifiScanStateChanged }; // 等待10个系统Ticks。每个ticks多少个us,计算方式= 1000 * 1000 / osKernelGetTickFreq() osDelay(10); // 注册监听器 WifiErrorCode errCode = RegisterWifiEvent(&eventListener); printf("RegisterWifiEvent: %drn", errCode); // 设置Wifi热点信息 WifiDeviceConfig apConfig = {}; strcpy(apConfig.ssid, "PDCN"); strcpy(apConfig.preSharedKey, "1234567888"); apConfig.securityType = WIFI_SEC_TYPE_PSK; int netId = -1; // 启用Wifi errCode = EnableWifi(); printf("EnableWifi: %drn", errCode); osDelay(10); // 设置Wifi热点配置信息,返回生成的网络Id-netId。 errCode = AddDeviceConfig(&apConfig, &netId); printf("AddDeviceConfig: %drn", errCode); // 根据网络Id连接到Wifi热点 g_connected = 0; errCode = ConnectTo(netId); printf("ConnectTo(%d): %drn", netId, errCode); // 未连接完成,则一直等待。g_connected状态会在事件中设置。 while (!g_connected) { osDelay(10); } printf("g_connected: %drn", g_connected); osDelay(50); // 联网业务开始,找到netifname=wlan0的netif。 struct netif* iface = netifapi_netif_find("wlan0"); if (iface) { // 启动DHCP客户端,获取IP地址 err_t ret = netifapi_dhcp_start(iface); printf("netifapi_dhcp_start: %drn", ret); // 等待DHCP服务器反馈给予地址 osDelay(300); // 执行线程安全的网络方法,第二个参数是voidFunc,第三个参数是errFunc。如果没有errFunc,那么就执行voidFunc。 // netifapi_dhcp_start/netifapi_dhcp_stop等都是调用的netifapi_netif_common方法。 // dhcp_clients_info_show显示信息 /* server : server_id : 192.168.0.1 mask : 255.255.255.0, 1 gw : 192.168.0.1 T0 : 3600 T1 : 1800 T2 : 3150 clients <1> : mac_idx mac addr state lease tries rto 0 b4c9b9af69f8 192.168.0.10 10 0 1 2 */ ret = netifapi_netif_common(iface, dhcp_clients_info_show, NULL); printf("netifapi_netif_common: %drn", ret); } TcpServerHandler(); // 联网业务结束,断开DHCP err_t ret = netifapi_dhcp_stop(iface); printf("netifapi_dhcp_stop: %drn", ret); // 断开Wifi热点连接 Disconnect(); // 移除Wifi热点的配置 RemoveDevice(netId); // 关闭Wifi errCode = DisableWifi(); printf("DisableWifi: %drn", errCode); osDelay(200);}void WifiSockets(void){ osThreadAttr_t wifisocket; wifisocket.name = "TcpServerTask"; wifisocket.attr_bits = 0U; wifisocket.cb_mem = NULL; wifisocket.cb_size = 0U; wifisocket.stack_mem = NULL; wifisocket.stack_size = 10240; wifisocket.priority = 25; if (osThreadNew(TcpServerTask, NULL, &wifisocket) == NULL) { printf("[Ssd1306TestDemo] Falied to create TcpServerTask!\n"); }}APP_FEATURE_INIT(WifiSockets); ⑥.编写主控制代码。 路径:openharmony\applications\sample\wifi-iot\app\wificar\robot_control.c 代码: static char data[128] = "";extern int connfd;void *RobotCarTestTask(void* param){ (void)param; float cmm = 0.0; printf("switch\r\n"); int i= 0; int flag = 0; while (1) { custom((i%11)*100 + 1000); GetDistance(&cmm); sprintf(data,"{\"angle\": %d,\"cm\":%f}",i,cmm); send(connfd, data, strlen(data), 0);//发送距离到APP //printf("\r\n cos = %d cm =%f\r\n",i,cmm); if(flag == 0) { i++; if(i%10 == 0) { flag = 1; } }else{ i--; if(i%11 == 0) { flag = 0; } } osDelay(25); //延时 250ms }}void RobotCarDemo(void){ osThreadAttr_t attr; attr.name = "RobotCarTestTask"; attr.attr_bits = 0U; attr.cb_mem = NULL; attr.cb_size = 0U; attr.stack_mem = NULL; attr.stack_size = 10240; attr.priority = 25; if (osThreadNew(RobotCarTestTask, NULL, &attr) == NULL) { printf("[Ssd1306TestDemo] Falied to create RobotCarTestTask!\n"); }}APP_FEATURE_INIT(RobotCarDemo); ⑦.编写编译描述文件。 路径:openharmony\applications\sample\wifi-iot\app\wificar\BUILD.gn 代码: static_library("car_wifi") { sources = [ "robot_l9110s.c", "robot_sg90.c", "robot_control.c", "robot_hcsr04.c", "wifi_sockets.c", ] deps =[ ] include_dirs = [ "//utils/native/lite/include", "//kernel/liteos_m/kal/cmsis", "//base/iot_hardware/peripheral/interfaces/kits", "//device/hisilicon/hispark_pegasus/hi3861_adapter/hals/communication/wifi_lite/wifiservice", "//device/hisilicon/hispark_pegasus/hi3861_adapter/kal", "//device/hisilicon/hispark_pegasus/sdk_liteos/third_party/lwip_sack/include", "//foundation/communication/wifi_lite/interfaces/wifiservice" ]} ⑧.加入编译。 路径:openharmony\applications\sample\wifi-iot\app\BUILD.gn 代码: import("//build/lite/config/component/lite_component.gni")lite_component("app") { features = [ "wificar:car_wifi" ]} ⑨.编译。 (1)设置编译路径。 hb set.(英文字符) (2)选择wifiiot_hispark_pegasus。 (3)执行编译。 hb build -f (4)输出路径 openharmony\out\hispark_pegasus\wifiiot_hispark_pegasus ⑩.烧录。 参考烧录:https://ost.51cto.com/posts/11118。
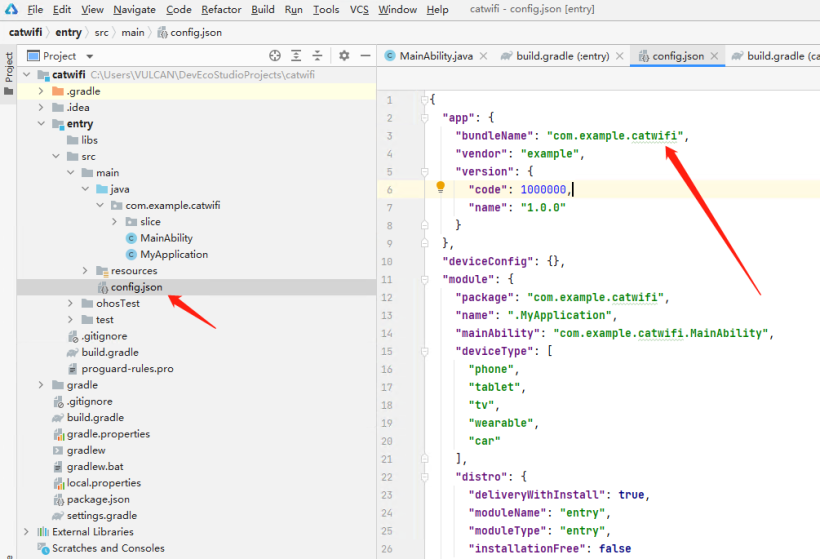
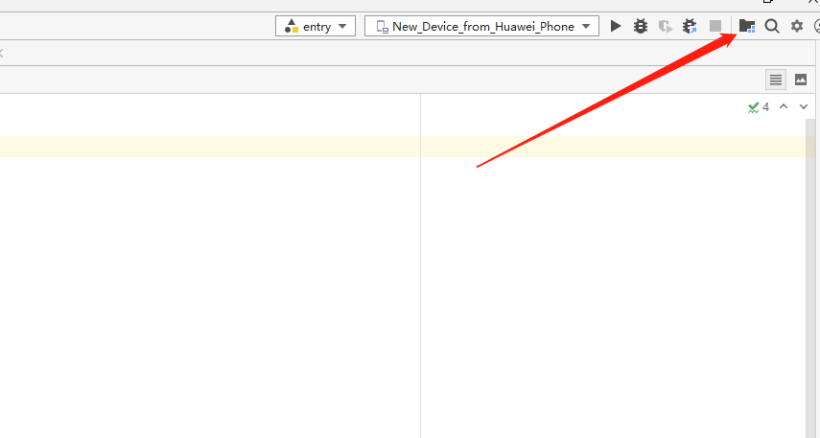
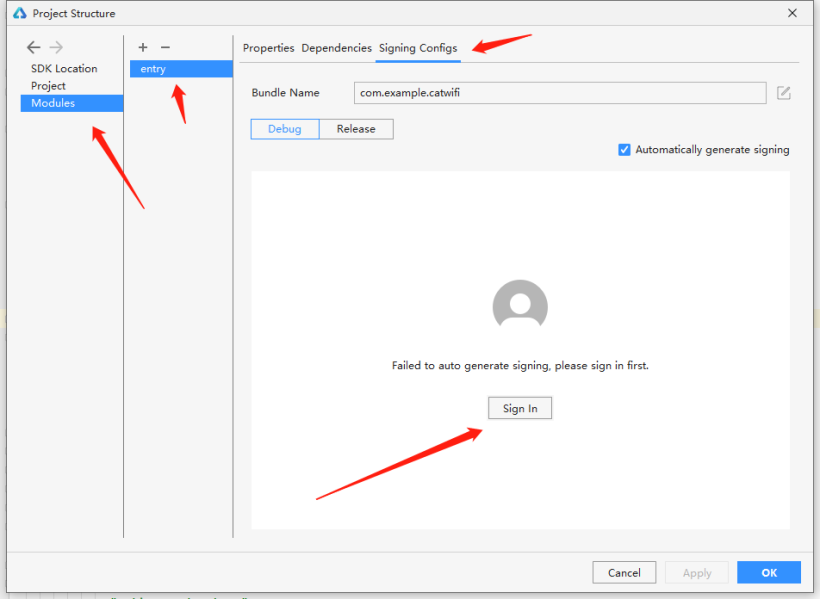
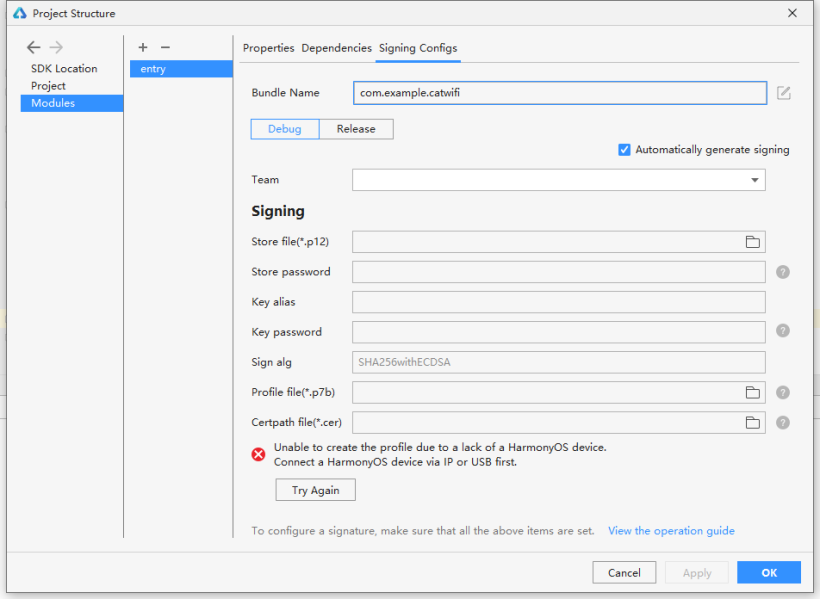
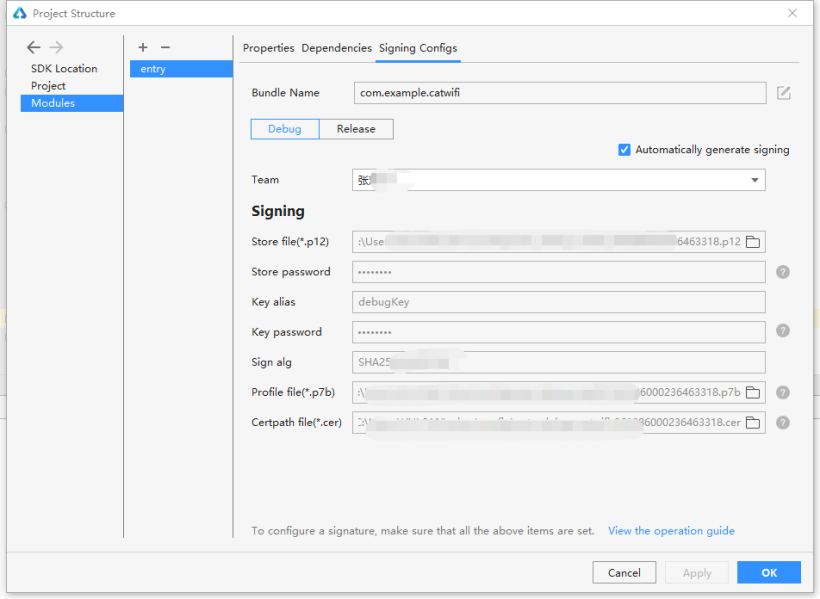
- ①.新建项目 打开 DevEco Studio 3.0.0.800。 选择File -> New ->New Project。 选择。 选择。 点击Finish。 ②.应用签名。 (1)复制bundleName。 (2)打开链接。 https://developer.huawei.com/consumer/cn/service/josp/agc/index.html#/myProject。 (3)点击添加项目。 (4)输入项目名。 (5)点击添加应用。 (6)如图设置。 (7)点击。 (8)登录。 (9)获取签名(未连接手机)。 (10)获取签名(连接手机),点击Try Again,获取成功。 ③.导入gson包 implementation 'com.google.code.gson:gson:2.8.9' ④.打开网络权限 "reqPermissions": [ {"name":"ohos.permission.GET_NETWORK_INFO"}, {"name":"ohos.permission.SET_NETWORK_INFO"}, {"name":"ohos.permission.INTERNET"}], ⑤.UI设置 这里对UI就不展开讲了 ⑥.编写代码 编写文件:Elements.java 代码: package com.example.wificardemo.slice;public class Elements { int angle = 0; float cm = 0;} 编写文件:MainAbilitySlice.java。 代码: package com.example.wificardemo.slice;import com.example.wificardemo.ResourceTable;import ohos.aafwk.ability.AbilitySlice;import ohos.aafwk.content.Intent;import ohos.agp.components.Button;import ohos.agp.components.Component;import ohos.agp.components.ProgressBar;import ohos.agp.components.TextField;import ohos.global.resource.Resource;import ohos.hiviewdfx.HiLog;import ohos.hiviewdfx.HiLogLabel;import java.util.List;public class MainAbilitySlice extends AbilitySlice { private static final HiLogLabel hilog = new HiLogLabel(HiLog.DEBUG ,0x0000, "test0002"); SocketTest ST = null; ProgressBar[] PB = new ProgressBar[11]; @Override public void onStart(Intent intent) { int pbs[] = {ResourceTable.Id_progressbar,ResourceTable.Id_progressbar1,ResourceTable.Id_progressbar2,ResourceTable.Id_progressbar3,ResourceTable.Id_progressbar4,ResourceTable.Id_progressbar5,ResourceTable.Id_progressbar6,ResourceTable.Id_progressbar7,ResourceTable.Id_progressbar8,ResourceTable.Id_progressbar9,ResourceTable.Id_progressbar10}; super.onStart(intent); super.setUIContent(ResourceTable.Layout_ability_main); Button connects = findComponentById(ResourceTable.Id_connect_car); Button bt1 = findComponentById(ResourceTable.Id_button1); Button bt2 = findComponentById(ResourceTable.Id_button2); Button bt3 = findComponentById(ResourceTable.Id_button3); Button bt4 = findComponentById(ResourceTable.Id_button4); Button bt5 = findComponentById(ResourceTable.Id_button5); TextField text_field = findComponentById(ResourceTable.Id_text_field); for(int i = 0;i<11;i++) { PB[i] = (ProgressBar)findComponentById(pbs[i]); } bt1.setClickedListener(new Component.ClickedListener() { @Override public void onClick(Component component) { ST.sockerSend(1,1); } }); bt2.setClickedListener(new Component.ClickedListener() { @Override public void onClick(Component component) { ST.sockerSend(1,4); } }); bt3.setClickedListener(new Component.ClickedListener() { @Override public void onClick(Component component) { ST.sockerSend(1,0); } }); bt4.setClickedListener(new Component.ClickedListener() { @Override public void onClick(Component component) { ST.sockerSend(1,2); } }) bt5.setClickedListener(new Component.ClickedListener() { @Override public void onClick(Component component) { ST.sockerSend(1,3); } }); connects.setClickedListener(new Component.ClickedListener() { @Override public void onClick(Component component) { if(ST !=null) { ST = null; //释放 } try { ST = new SocketTest(MainAbilitySlice.this,text_field.getText().toString(),20222); ST.start(); Thread.sleep(200); //ST.sockerSend(5,0,0); } catch (Exception e) { e.printStackTrace(); } } }); } //Socker 接收回调函数 public void socketCallback(Elements con) { getUITaskDispatcher().asyncDispatch(new Runnable() { @Override public void run() { PB[con.angle].setProgressValue(con.cm>100 ? 100:(int)con.cm); } }); } @Override public void onActive() { super.onActive(); } @Override public void onForeground(Intent intent) { super.onForeground(intent); }} 编写文件:SocketTest.java。 代码: package com.example.wificardemo.slice;import com.google.gson.Gson;import ohos.hiviewdfx.HiLog;import ohos.hiviewdfx.HiLogLabel;import java.io.IOException;import java.io.InputStream;import java.io.OutputStream;import java.net.Socket;public class SocketTest extends Thread{ private static final HiLogLabel hilog = new HiLogLabel(HiLog.DEBUG ,0x0000, "test0002"); Socket socket = null; String host =""; int port = 0; InputStream inputStream = null; OutputStream outputStream=null; public boolean flag; MainAbilitySlice mains = null; public SocketTest(MainAbilitySlice mains,String host,int port) { this.mains = mains; this.host = host; this.port = port; } public void sockerSend(int a,int b){ if(socket != null && outputStream != null) { new Thread(new Runnable() { @Override public void run() { try { byte[] data = new byte[3]; data[0] = (byte) 0xaa; data[1] = (byte) a; data[2] = (byte) b; //data[3] = (byte) c; outputStream.write(data); outputStream.flush(); } catch (IOException e) { e.printStackTrace(); } } }).start(); }else{ } } @Override public void run() { try { flag = true; while (flag) { socket = new Socket(host, port); outputStream = socket.getOutputStream(); inputStream =socket.getInputStream(); init1(); socket.close(); } } catch (IOException e) { System.out.println("net erorr!"+e); } } public void init1() { try { byte[] b = new byte[1024]; while (flag) { int n = inputStream.read(b); if(n !=-1) { byte[] data = new byte[n]; for (int i=0;i<n;i++) { data[i] = b[i]; } String str = new String(data); Gson gson = new Gson(); HiLog.debug(hilog,"net !"+str,""); if(n > 10) { mains.socketCallback(gson.fromJson(str, Elements.class)); } }else break; } }catch (Exception e){ HiLog.debug(hilog,"net erorr!"+e,""); } }} ⑦.点击RUN 安装到手机。
- 视频链接:https://www.bilibili.com/video/BV1pS4y1Y72j/。 代码开源地址:https://gitee.com/yukoyu/harmony-wifi-car。 测试成功!。 想了解更多内容,请访问: 51CTO和华为官方合作共建的鸿蒙技术社区 https://ost.51cto.com

①.本项目采用的开发套件为HiSpark Wi-Fi IoT智能小车。
②.项目预览。
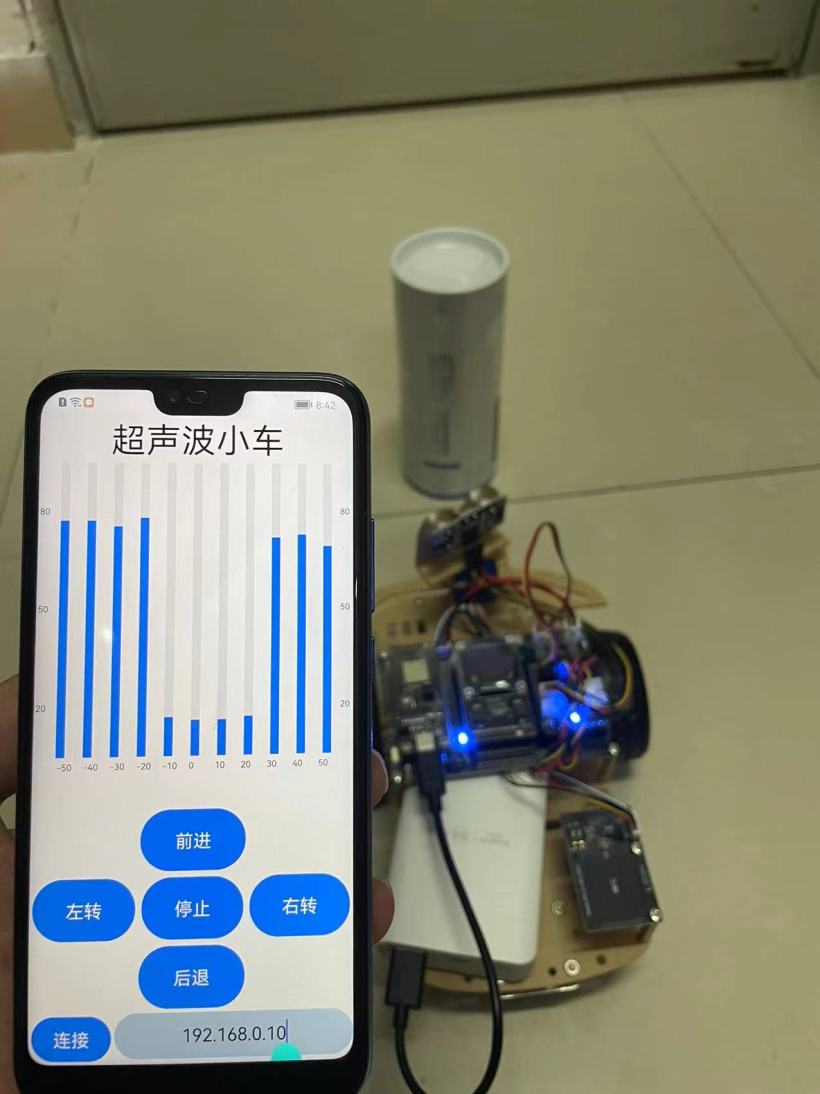
视频链接:https://www.bilibili.com/video/BV1pS4y1Y72j/。
代码开源地址:https://gitee.com/yukoyu/harmony-wifi-car。
③.框架图
④.HarmonyOS采用 JAVA方式开发
①.新建文件夹。
路径:openharmony\applications\sample\wifi-iot\app\
mkdir wificar
②.编写小车电机驱动。
路径:openharmony\applications\sample\wifi-iot\app\wificar\robot_l9110s.c
代码:
#define GPIO0 0
#define GPIO1 1
#define GPIO9 9
#define GPIO10 10
#define GPIOFUNC 0
#define PWM_FREQ_FREQUENCY  (60000)
void gpio_control (unsigned int  gpio, IotGpioValue value) {
  hi_io_set_func(gpio, GPIOFUNC);
  IoTGpioSetDir(gpio, IOT_GPIO_DIR_OUT);
  IoTGpioSetOutputVal(gpio, value);
}
//后退
void car_backward(void) {
  gpio_control(GPIO0, IOT_GPIO_VALUE0);
  gpio_control(GPIO1, IOT_GPIO_VALUE1);
  gpio_control(GPIO9, IOT_GPIO_VALUE0);
  gpio_control(GPIO10, IOT_GPIO_VALUE1);
}
//前进
void car_forward(void) {
  gpio_control(GPIO0, IOT_GPIO_VALUE1);
  gpio_control(GPIO1, IOT_GPIO_VALUE0);
  gpio_control(GPIO9, IOT_GPIO_VALUE1);
  gpio_control(GPIO10, IOT_GPIO_VALUE0);
}
//左转
void car_left(void) {
  gpio_control(GPIO0, IOT_GPIO_VALUE0);
  gpio_control(GPIO1, IOT_GPIO_VALUE0);
  gpio_control(GPIO9, IOT_GPIO_VALUE1);
  gpio_control(GPIO10, IOT_GPIO_VALUE0);
}
//右转
void car_right(void) {
  gpio_control(GPIO0, IOT_GPIO_VALUE1);
  gpio_control(GPIO1, IOT_GPIO_VALUE0);
  gpio_control(GPIO9, IOT_GPIO_VALUE0);
  gpio_control(GPIO10, IOT_GPIO_VALUE0);
}
//停止转动
void car_stop(void) {
  gpio_control(GPIO0, IOT_GPIO_VALUE1);
  gpio_control(GPIO1, IOT_GPIO_VALUE1);
  gpio_control(GPIO9, IOT_GPIO_VALUE1);
  gpio_control(GPIO10, IOT_GPIO_VALUE1);
}
③.编写舵机驱动。
路径:openharmony\applications\sample\wifi-iot\app\wificar\robot_sg90.c
代码:
#define GPIO2 2
void set_angle( unsigned int duty) {
  IoTGpioInit(GPIO2);
  IoTGpioSetDir(GPIO2, IOT_GPIO_DIR_OUT);
  IoTGpioSetOutputVal(GPIO2, IOT_GPIO_VALUE1);
  hi_udelay(duty);
  IoTGpioSetOutputVal(GPIO2, IOT_GPIO_VALUE0);
  hi_udelay(20000 - duty);
}
//控制电机转动角度  参数范围 1000<time<2000
void custom(int time)
{
  for (int i = 0; i <10; i++) {
    set_angle(time);
  }
}
④.编写超声波驱动。
路径:openharmony\applications\sample\wifi-iot\app\wificar\robot_hcsr04.c
代码:
#define GPIO_8 8
#define GPIO_7 7
#define GPIO_FUNC 0
extern int cmm;
void GetDistance  (float *distance) {
  static unsigned long start_time = 0, time = 0;
  IotGpioValue value = IOT_GPIO_VALUE0;
  unsigned int flag = 0;
  IoTWatchDogDisable();
  hi_io_set_func(GPIO_8, GPIO_FUNC);
  IoTGpioSetDir(GPIO_8, IOT_GPIO_DIR_IN);
  IoTGpioSetDir(GPIO_7, IOT_GPIO_DIR_OUT);
  IoTGpioSetOutputVal(GPIO_7, IOT_GPIO_VALUE1);
  hi_udelay(20);
  IoTGpioSetOutputVal(GPIO_7, IOT_GPIO_VALUE0);
  while (1) {
    IoTGpioGetInputVal(GPIO_8, &value);
    if ( value == IOT_GPIO_VALUE1 && flag == 0)
     start_time = hi_get_us();
    flag = 1;
  }
  if (value == IOT_GPIO_VALUE0 && flag == 1) {
        time = hi_get_us() - start_time;
        start_time = 0;
        break;
  }
  }
  *distance = time * 0.034 / 2;
  printf("distance is %f\r\n",*distance);
  return ;
}
⑤.编写wifi和socket server。
路径:openharmony\applications\sample\wifi-iot\app\wificar\wifi_sockets.c
代码:
// 接收、发送的数据
static char request[256] = "";
// 未连接热点=0,已连接热点=1
static int g_connected = 0;
int connfd = -1;
// 输出连接信息字符串
// 打印内容样例--> bssid: 38:47:BC:49:01:FA, rssi: 0, connState: 0, reason: 0, ssid: MyMobile
void PrintLinkedInfo(WifiLinkedInfo* info) {
  if (!info) return;
  static char macAddress[32] = {0};
  unsigned char* mac = info->bssid;
  snprintf(macAddress, sizeof(macAddress), "%02X:%02X:%02X:%02X:%02X:%02X", mac[0], mac[1], mac[2], mac[3], mac[4], mac[5]);
  printf("bssid: %s, rssi: %d, connState: %d, reason: %d, ssid: %srn", macAddress, info->rssi, info->connState, info->disconnectedReason, info->ssid);
}
// 连接状态改变事件处理
void OnWifiConnectionChanged(int state, WifiLinkedInfo* info) {
  if (!info) return;
  // 输出类似内容:OnWifiConnectionChanged 31, state = 1, info =
  printf("%s %d, state = %d, info = rn", __FUNCTION__, __LINE__, state);
  PrintLinkedInfo(info);
  // 根据连接状态设置g_connected
  if (state == WIFI_STATE_AVALIABLE) {
    g_connected = 1;
  } else {
    g_connected = 0;
  }
}
// 扫描状态改变事件处理
void OnWifiScanStateChanged(int state, int size) {
  printf("%s %d, state = %X, size = %drn", __FUNCTION__, __LINE__, state, size);
}
void DisconnectTcpSocket(int connfd) {
  sleep(1);
  printf("do_disconnect...rn");
  lwip_close(connfd);
  sleep(1); // for debug
}
void CloseTcpSocket(int socketfd) {
  printf("do_cleanup...rn");
  lwip_close(socketfd);
}
static void TcpServerHandler(void) {
  ssize_t retval = 0;
  unsigned short port = 20222;
  // 创建一个通信的Socket,并返回一个Socket文件描述符。第一个参数IpV4,第二个参数SOCK_STREAM类型,第三个指用到的协议
  int sockfd = socket(AF_INET, SOCK_STREAM, 0);
  // 客户端地址和地址长度
  struct sockaddr_in clientAddr = {0};
  socklen_t clientAddrLen = sizeof(clientAddr);
  // 服务端地址
  struct sockaddr_in serverAddr = {0};
  serverAddr.sin_family = AF_INET;
  // htons是将整型变量从主机字节顺序转变成网络字节顺序,就是整数在地址空间存储方式变为高位字节存放在内存的低地址处
  serverAddr.sin_port = htons(port);
  // 监听本机的所有IP地址,INADDR_ANY=0x0
  // 将主机数转换成无符号长整型的网络字节顺序
  serverAddr.sin_addr.s_addr = htonl(INADDR_ANY);
  // 服务端绑定端口
  retval = bind(sockfd, (struct sockaddr *)&serverAddr, sizeof(serverAddr));
  if (retval < 0) {
    printf("bind failed, %ld!rn", retval);
    CloseTcpSocket(sockfd);
    return;
  }
  printf("bind to port %d success!rn", port);
  // 开始监听,backlog指Pending连接队列增长到的最大长度。队列满了,再有新连接请求到达,则客户端ECONNREFUSED错误。如果支持重传,则请求忽略。
  int backlog = 1;
  retval = listen(sockfd, backlog);
  if (retval < 0) {
    printf("listen failed!rn");
    CloseTcpSocket(sockfd);
    return;
  }
  printf("listen with %d backlog success!rn", backlog);
  int outerFlag = 1;
  while (outerFlag) {
    // 接受客户端连接,成功会返回一个表示连接的 socket。clientAddr参数将会携带客户端主机和端口信息;失败返回 -1
    // 从Pending连接队列中获取第一个连接,根据sockfd的socket协议、地址族等内容创建一个新的socket文件描述,并返回。
    // 此后的 收、发 都在 表示连接的 socket 上进行;之后 sockfd 依然可以继续接受其他客户端的连接,
    // UNIX系统上经典的并发模型是“每个连接一个进程”——创建子进程处理连接,父进程继续接受其他客户端的连接
    // 鸿蒙liteos-a内核之上,可以使用UNIX的“每个连接一个进程”的并发模型liteos-m内核之上,可以使用“每个连接一个线程”的并发模型
    connfd = accept(sockfd, (struct sockaddr *)&clientAddr, &clientAddrLen);
    if (connfd < 0) {
    printf("accept failed, %d, %drn", connfd, errno);
    CloseTcpSocket(sockfd);
    //outerFlag = 0;
    }
    printf("accept success, connfd = %d !rn", connfd);
    // inet_ntoa:网络地址转换成“.”点隔的字符串格式。ntohs:16位数由网络字节顺序转换为主机字节顺序。
    printf("client addr info: host = %s, port = %drn", inet_ntoa(clientAddr.sin_addr), ntohs(clientAddr.sin_port));
    int innerFlag = 1;
    // 接收消息,然后发送回去
    while (innerFlag) {
    // 后续 收、发 都在 表示连接的 socket 上进行;
    // 在新的Socket文件描述上接收信息.
    retval = recv(connfd, request, sizeof(request), 0);
    if (retval < 0) {
      printf("recv request failed, %ld!rn", retval);
      innerFlag = 0;
    } else if (retval == 0) {
      // 对方主动断开连接
      printf("client disconnected!rn");
      innerFlag = 0;
    } else {
      //printf("recv request{%s} from client done!rn", request);
      // 发送数据
      printf("cc = %d %d %d \r\n",request[0],request[1],request[2]);
      if (retval <= 0) {
      printf("send response failed, %ld!rn", retval);
      innerFlag = 0;
      }
      if(retval == 3 &&  request[0] == -86)
      {
        if(request[1] = 0x00){
          retval = send(connfd, "aaok", strlen("aaok"), 0);
        }
        if(request[1] = 0x01)
        {
          switch (request[2])
          {
          case 1: car_forward();break;
          case 2: car_right();break;
          case 3: car_backward();break;
          case 4: car_left();break;
          case 0: car_stop();break;
          }
        }
      }
      //printf("send response{%s} to client done!rn", request);
      // 清空缓冲区
      memset(&request, 0, sizeof(request));
    }
    if(innerFlag == 0)
    {
      DisconnectTcpSocket(connfd);
      //outerFlag = 0;
    }
  }
  CloseTcpSocket(sockfd);
  }
}
void *TcpServerTask(void *arg) {
  (void)arg;
  // 先定义两个Wifi监听器,一个连接改变、一个状态改变
  WifiEvent eventListener = {
  .OnWifiConnectionChanged = OnWifiConnectionChanged,
  .OnWifiScanStateChanged = OnWifiScanStateChanged
  };
  // 等待10个系统Ticks。每个ticks多少个us,计算方式= 1000 * 1000 / osKernelGetTickFreq()
  osDelay(10);
  // 注册监听器
  WifiErrorCode errCode = RegisterWifiEvent(&eventListener);
  printf("RegisterWifiEvent: %drn", errCode);
  // 设置Wifi热点信息
  WifiDeviceConfig apConfig = {};
  strcpy(apConfig.ssid, "PDCN");
  strcpy(apConfig.preSharedKey, "1234567888");
  apConfig.securityType = WIFI_SEC_TYPE_PSK;
  int netId = -1;
  // 启用Wifi
  errCode = EnableWifi();
  printf("EnableWifi: %drn", errCode);
  osDelay(10);
  // 设置Wifi热点配置信息,返回生成的网络Id-netId。
  errCode = AddDeviceConfig(&apConfig, &netId);
  printf("AddDeviceConfig: %drn", errCode);
  // 根据网络Id连接到Wifi热点
  g_connected = 0;
  errCode = ConnectTo(netId);
  printf("ConnectTo(%d): %drn", netId, errCode);
  // 未连接完成,则一直等待。g_connected状态会在事件中设置。
  while (!g_connected) {
  osDelay(10);
  }
  printf("g_connected: %drn", g_connected);
  osDelay(50);
  // 联网业务开始,找到netifname=wlan0的netif。
  struct netif* iface = netifapi_netif_find("wlan0");
  if (iface) {
  // 启动DHCP客户端,获取IP地址
  err_t ret = netifapi_dhcp_start(iface);
  printf("netifapi_dhcp_start: %drn", ret);
  // 等待DHCP服务器反馈给予地址
  osDelay(300);
  // 执行线程安全的网络方法,第二个参数是voidFunc,第三个参数是errFunc。如果没有errFunc,那么就执行voidFunc。
  // netifapi_dhcp_start/netifapi_dhcp_stop等都是调用的netifapi_netif_common方法。
  // dhcp_clients_info_show显示信息
  /*
  server :
    server_id : 192.168.0.1
    mask : 255.255.255.0, 1
    gw : 192.168.0.1
    T0 : 3600
    T1 : 1800
    T2 : 3150
  clients <1> :
    mac_idx mac       addr       state  lease  tries  rto
    0    b4c9b9af69f8   192.168.0.10  10    0    1    2
  */
  ret = netifapi_netif_common(iface, dhcp_clients_info_show, NULL);
  printf("netifapi_netif_common: %drn", ret);
  }
  TcpServerHandler();
  // 联网业务结束,断开DHCP
  err_t ret = netifapi_dhcp_stop(iface);
  printf("netifapi_dhcp_stop: %drn", ret);
  // 断开Wifi热点连接
  Disconnect();
  // 移除Wifi热点的配置
  RemoveDevice(netId);
  // 关闭Wifi
  errCode = DisableWifi();
  printf("DisableWifi: %drn", errCode);
  osDelay(200);
}
void WifiSockets(void)
{
  osThreadAttr_t wifisocket;
  wifisocket.name = "TcpServerTask";
  wifisocket.attr_bits = 0U;
  wifisocket.cb_mem = NULL;
  wifisocket.cb_size = 0U;
  wifisocket.stack_mem = NULL;
  wifisocket.stack_size = 10240;
  wifisocket.priority = 25;
  if (osThreadNew(TcpServerTask, NULL, &wifisocket) == NULL) {
    printf("[Ssd1306TestDemo] Falied to create TcpServerTask!\n");
  }
}
APP_FEATURE_INIT(WifiSockets);
⑥.编写主控制代码。
路径:openharmony\applications\sample\wifi-iot\app\wificar\robot_control.c
代码:
static char data[128] = "";
extern int connfd;
void *RobotCarTestTask(void* param)
{
  (void)param;
  float cmm = 0.0;
  printf("switch\r\n");
  int i= 0;
  int flag = 0;
  while (1) {
    custom((i%11)*100 + 1000);
    GetDistance(&cmm);
    sprintf(data,"{\"angle\": %d,\"cm\":%f}",i,cmm);
    send(connfd, data, strlen(data), 0);//发送距离到APP
    //printf("\r\n cos = %d  cm =%f\r\n",i,cmm);
    if(flag == 0)
    {
      i++;
      if(i%10 == 0)
      {
        flag = 1;
      }
    }else{
      i--;
      if(i%11 == 0)
      {
        flag = 0;
      }
    }
    osDelay(25); //延时 250ms
  }
}
void RobotCarDemo(void)
{
  osThreadAttr_t attr;
  attr.name = "RobotCarTestTask";
  attr.attr_bits = 0U;
  attr.cb_mem = NULL;
  attr.cb_size = 0U;
  attr.stack_mem = NULL;
  attr.stack_size = 10240;
  attr.priority = 25;
  if (osThreadNew(RobotCarTestTask, NULL, &attr) == NULL) {
    printf("[Ssd1306TestDemo] Falied to create RobotCarTestTask!\n");
  }
}
APP_FEATURE_INIT(RobotCarDemo);
⑦.编写编译描述文件。
路径:openharmony\applications\sample\wifi-iot\app\wificar\BUILD.gn
代码:
static_library("car_wifi") {
    sources = [
        "robot_l9110s.c",
        "robot_sg90.c",
        "robot_control.c",
        "robot_hcsr04.c",
        "wifi_sockets.c",
    ]
    deps =[
    ]
    include_dirs = [
        "//utils/native/lite/include",
        "//kernel/liteos_m/kal/cmsis",
        "//base/iot_hardware/peripheral/interfaces/kits",
        "//device/hisilicon/hispark_pegasus/hi3861_adapter/hals/communication/wifi_lite/wifiservice",
        "//device/hisilicon/hispark_pegasus/hi3861_adapter/kal",
        "//device/hisilicon/hispark_pegasus/sdk_liteos/third_party/lwip_sack/include",
        "//foundation/communication/wifi_lite/interfaces/wifiservice"
    ]
}
⑧.加入编译。
路径:openharmony\applications\sample\wifi-iot\app\BUILD.gn
代码:
import("//build/lite/config/component/lite_component.gni")
lite_component("app") {
    features = [
        "wificar:car_wifi"
    ]
}
⑨.编译。
(1)设置编译路径。
hb set
.(英文字符)
(2)选择wifiiot_hispark_pegasus。
(3)执行编译。
hb build -f
(4)输出路径
openharmony\out\hispark_pegasus\wifiiot_hispark_pegasus
⑩.烧录。
参考烧录:https://ost.51cto.com/posts/11118。
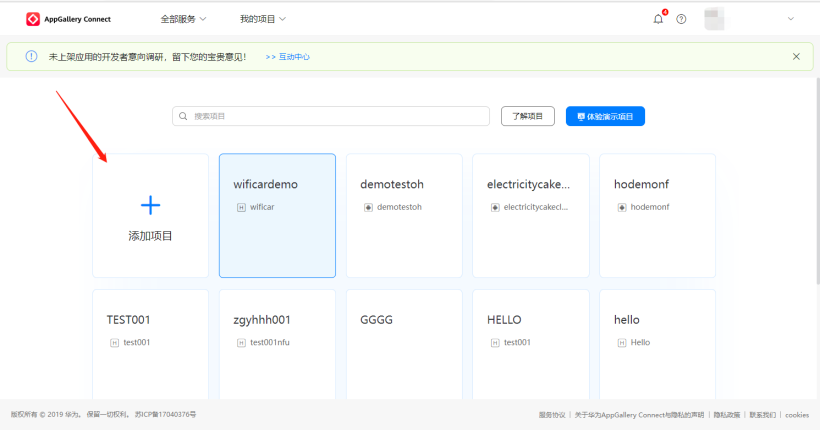
①.新建项目
打开 DevEco Studio 3.0.0.800。
选择File -> New ->New Project。
选择。

选择。
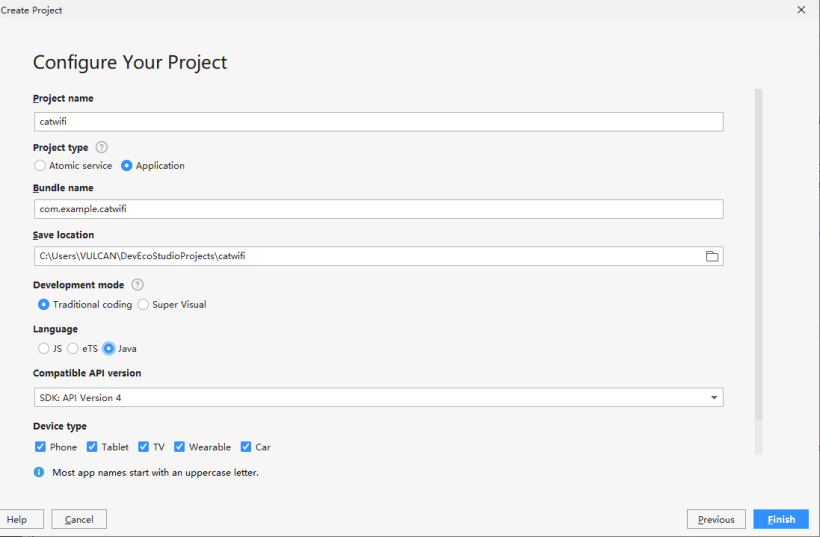
点击Finish。
②.应用签名。
(1)复制bundleName。
(2)打开链接。
https://developer.huawei.com/consumer/cn/service/josp/agc/index.html#/myProject。
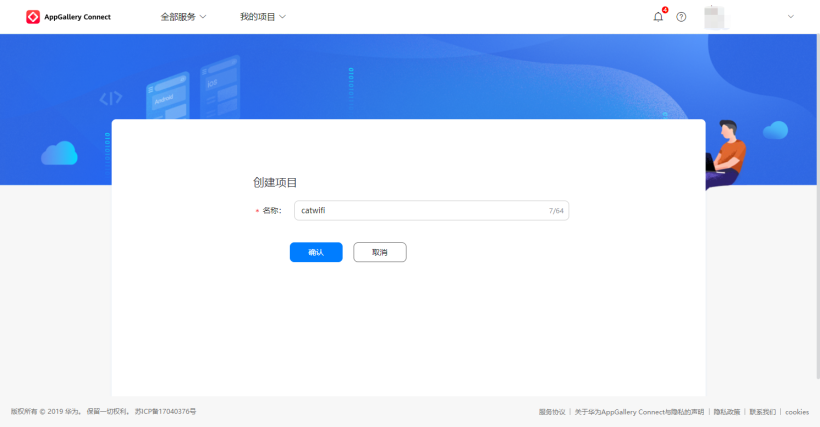
(3)点击添加项目。
(4)输入项目名。
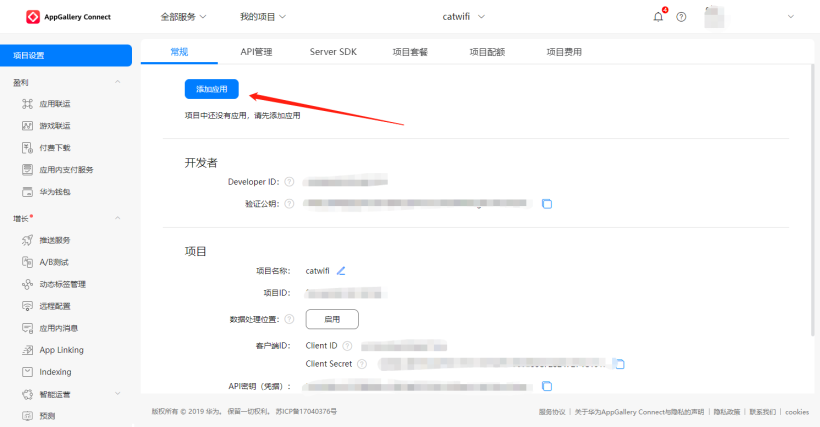
(5)点击添加应用。
(6)如图设置。
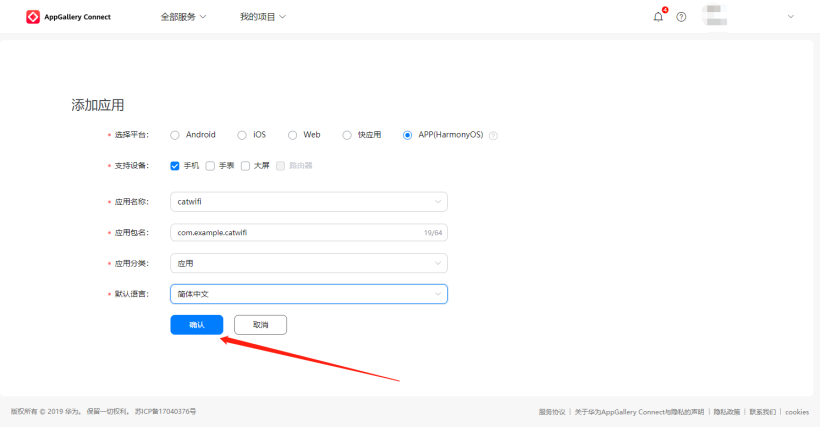
(7)点击。
(8)登录。
(9)获取签名(未连接手机)。
(10)获取签名(连接手机),点击Try Again,获取成功。
③.导入gson包
implementation 'com.google.code.gson:gson:2.8.9'
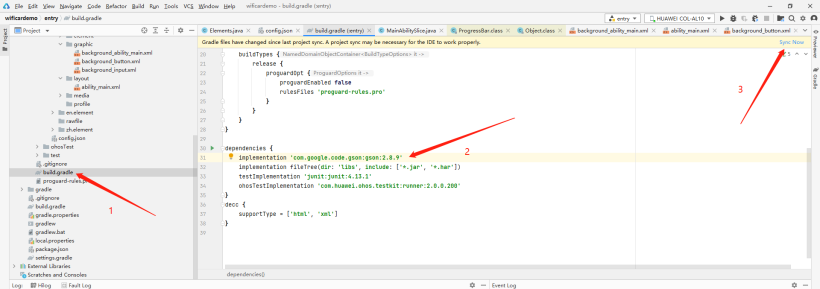
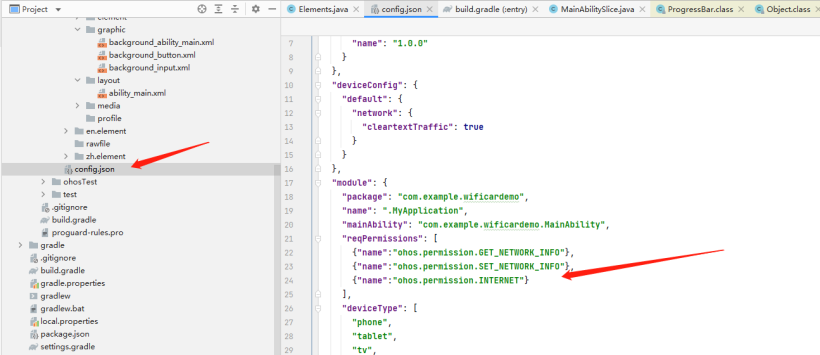
④.打开网络权限
"reqPermissions": [
  {"name":"ohos.permission.GET_NETWORK_INFO"},
  {"name":"ohos.permission.SET_NETWORK_INFO"},
  {"name":"ohos.permission.INTERNET"}
],
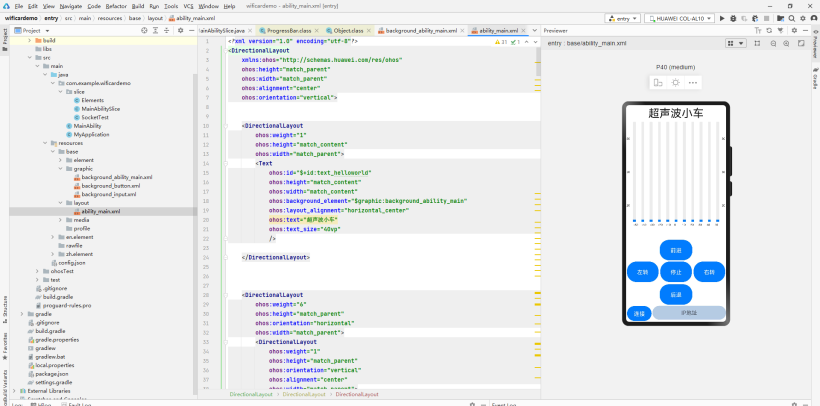
⑤.UI设置
这里对UI就不展开讲了
⑥.编写代码
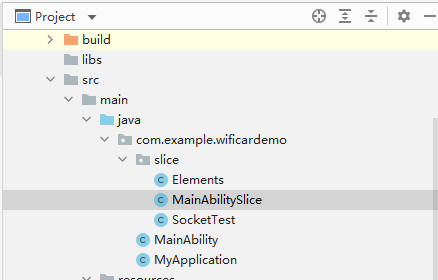
编写文件:Elements.java
代码:
package com.example.wificardemo.slice;
public class Elements {
    int angle = 0;
    float cm = 0;
}
编写文件:MainAbilitySlice.java。
代码:
package com.example.wificardemo.slice;
import com.example.wificardemo.ResourceTable;
import ohos.aafwk.ability.AbilitySlice;
import ohos.aafwk.content.Intent;
import ohos.agp.components.Button;
import ohos.agp.components.Component;
import ohos.agp.components.ProgressBar;
import ohos.agp.components.TextField;
import ohos.global.resource.Resource;
import ohos.hiviewdfx.HiLog;
import ohos.hiviewdfx.HiLogLabel;
import java.util.List;
public class MainAbilitySlice extends AbilitySlice {
    private static final HiLogLabel hilog = new HiLogLabel(HiLog.DEBUG ,0x0000, "test0002");
    SocketTest ST = null;
    ProgressBar[] PB = new ProgressBar[11];
    @Override
    public void onStart(Intent intent) {
        int pbs[] = {ResourceTable.Id_progressbar,ResourceTable.Id_progressbar1,ResourceTable.Id_progressbar2,ResourceTable.Id_progressbar3,ResourceTable.Id_progressbar4,ResourceTable.Id_progressbar5,ResourceTable.Id_progressbar6,ResourceTable.Id_progressbar7,ResourceTable.Id_progressbar8,ResourceTable.Id_progressbar9,ResourceTable.Id_progressbar10};
        super.onStart(intent);
        super.setUIContent(ResourceTable.Layout_ability_main);
        Button connects = findComponentById(ResourceTable.Id_connect_car);
        Button bt1 = findComponentById(ResourceTable.Id_button1);
        Button bt2 = findComponentById(ResourceTable.Id_button2);
        Button bt3 = findComponentById(ResourceTable.Id_button3);
        Button bt4 = findComponentById(ResourceTable.Id_button4);
        Button bt5 = findComponentById(ResourceTable.Id_button5);
        TextField text_field = findComponentById(ResourceTable.Id_text_field);
        for(int i = 0;i<11;i++)
        {
            PB[i] = (ProgressBar)findComponentById(pbs[i]);
        }
        bt1.setClickedListener(new Component.ClickedListener() {
            @Override
            public void onClick(Component component) {
                ST.sockerSend(1,1);
            }
        });
        bt2.setClickedListener(new Component.ClickedListener() {
            @Override
            public void onClick(Component component) {
                ST.sockerSend(1,4);
            }
        });
        bt3.setClickedListener(new Component.ClickedListener() {
            @Override
            public void onClick(Component component) {
                ST.sockerSend(1,0);
            }
        });
        bt4.setClickedListener(new Component.ClickedListener() {
            @Override
            public void onClick(Component component) {
                ST.sockerSend(1,2);
            }
        })
        bt5.setClickedListener(new Component.ClickedListener() {
            @Override
            public void onClick(Component component) {
                ST.sockerSend(1,3);
            }
        });
        connects.setClickedListener(new Component.ClickedListener() {
            @Override
            public void onClick(Component component) {
                if(ST !=null)
                {
                    ST = null; //释放
                }
                try {
                    ST = new SocketTest(MainAbilitySlice.this,text_field.getText().toString(),20222);
                    ST.start();
                    Thread.sleep(200);
                    //ST.sockerSend(5,0,0);
                } catch (Exception e) {
                    e.printStackTrace();
                }
            }
        });
    }
    //Socker 接收回调函数
    public void socketCallback(Elements con) {

        getUITaskDispatcher().asyncDispatch(new Runnable() {
            @Override
            public void run() {
                PB[con.angle].setProgressValue(con.cm>100 ? 100:(int)con.cm);
            }
        });
    }
    @Override
    public void onActive() {
        super.onActive();
    }
    @Override
    public void onForeground(Intent intent) {
        super.onForeground(intent);
    }
}
编写文件:SocketTest.java。
代码:
package com.example.wificardemo.slice;
import com.google.gson.Gson;
import ohos.hiviewdfx.HiLog;
import ohos.hiviewdfx.HiLogLabel;
import java.io.IOException;
import java.io.InputStream;
import java.io.OutputStream;
import java.net.Socket;
public class SocketTest extends Thread{
    private static final HiLogLabel hilog = new HiLogLabel(HiLog.DEBUG ,0x0000, "test0002");
    Socket socket = null;
    String host ="";
    int port = 0;
    InputStream inputStream = null;
    OutputStream outputStream=null;
    public boolean flag;
    MainAbilitySlice mains = null;
    public SocketTest(MainAbilitySlice mains,String host,int port) {
        this.mains = mains;
        this.host = host;
        this.port = port;
    }
    public void sockerSend(int a,int b){
        if(socket != null && outputStream != null)
        {
            new Thread(new Runnable() {
                @Override
                public void run() {
                    try {
                        byte[] data =  new byte[3];
                        data[0] = (byte) 0xaa;
                        data[1] = (byte) a;
                        data[2] = (byte) b;
                        //data[3] = (byte) c;
                        outputStream.write(data);
                        outputStream.flush();
                    } catch (IOException e) {
                        e.printStackTrace();
                    }
                }
            }).start();
        }else{

        }
    }
    @Override
    public void run() {
        try {
            flag = true;
            while (flag)
            {
                socket = new Socket(host, port);
                outputStream = socket.getOutputStream();
                inputStream =socket.getInputStream();
                init1();
                socket.close();
            }
        } catch (IOException e) {
            System.out.println("net erorr!"+e);
        }
    }
    public void init1() {
        try {
            byte[] b = new byte[1024];
            while (flag)
            {
                int n = inputStream.read(b);
                if(n !=-1)
                {
                    byte[] data = new byte[n];
                    for (int i=0;i<n;i++)
                    {
                        data[i] = b[i];
                    }
                    String str = new String(data);
                    Gson gson = new Gson();
                    HiLog.debug(hilog,"net !"+str,"");
                    if(n > 10) {
                        mains.socketCallback(gson.fromJson(str, Elements.class));
                    }
                }else break;
            }
        }catch (Exception e){
            HiLog.debug(hilog,"net erorr!"+e,"");
        }
    }
}
⑦.点击RUN 安装到手机。


视频链接:https://www.bilibili.com/video/BV1pS4y1Y72j/。
代码开源地址:https://gitee.com/yukoyu/harmony-wifi-car。
测试成功!。

© 版权声明
文章版权归作者所有,未经允许请勿转载。