
文章目录
- 最近在学习openHarmony,恰好之前了解过canvas,所以本篇文章分享一下我实现的一个手绘板,利用openHarmony内置的API cnavas组件实现。
- 这是一个手绘板,并且可以根据滑动屏幕速度,动态生成线条大小,当用户触摸屏幕,会生成线条,并且速度越快,线条越细。
-
- 使用前,需要线了解canvas组件,可以参考harmonyOS开发者文档,文档介绍的非常详细,这里就不多介绍了。 首先,我们需要将canvas上下文对象,需要在触摸移动事件中绑定,因为我们是通过触摸来生成对应线条的。 然后,属性选择lineCap,属性值有三种:butt、round、square,我尝试了后发现round效果比较好。 属性值为butt时的效果 属性值为round 属性值为square 其实butt效果也还行,就是锯齿太严重,虽然API中有内置抗锯齿属性,但是不知道为啥设置了没有效果,可能粒度太大了,现在这个粒度已经有点卡了,如果把粒度小设置小一点估计更卡。综上还是选择了round,它会将线端点以圆形结束,所以效果上更圆润。 最后将数组中的最后一个值取出,作为moveTo的坐标,将鼠标移动后的点作为lineTo的坐标,然后再通过stroke就能绘制出图像。 绘制直线,通常使用moveTo ()与lineTo ()两个方法。. moveTo ()方法用于将画笔移至指定点并以改点为直线的开始点,lineTo ()则为结束点。 const el = this.$refs.canvas; this.ctx = el.getContext('2d') this.ctx.lineWidth =this.lineWidth/2 this.ctx.beginPath() // 向线条的每个末端添加圆形线帽。 this.ctx.lineCap = 'square' // 每次将数组中最后一个值取出,作为起始点 this.ctx.moveTo(this.ArrX[this.ArrX.length-1],this.ArrY[this.ArrY.length-1]) this.ctx.lineTo(e.touches[0].localX,e.touches[0].localY) this.ctx.stroke() this.ArrX.push(e.touches[0].localX) this.ArrY.push(e.touches[0].localY)
- 想要通过速度来计算线条粗细,那么可以是需要获取两点之间的时间,通过时间和距离得到速度。 当触发touchmove事件,将当前时间戳存储起来,通过上一次触发事件获得的时间-当前触发事件获得的时间,就可以得到两次触发事件的事件间隔,此时我们就获得了两点之间的时间。 再计算两点之间的距离(平方和再开根号),通过 路程/时间 = 速度计算出两点之间的速度,从而可以动态生成线条粗细。 // 计算线条粗细 const currTime = Date.now() if(this.startTime !== 0){ const duration = currTime - this.startTime // 传入倒数第二个点和最后一个点,和持续时间,会返回加速度 const v = this.speed(this.ArrX[this.ArrX.length-2],this.ArrY[this.ArrY.length-2],this.ArrX[this.ArrX.length-1],this.ArrY[this.ArrY.length-1],duration) this.lineWidth = this.lineWidth/v if(this.lineWidth>25){ this.lineWidth = 25 } if(this.lineWidth<1){ this.lineWidth = 1 } } this.startTime = currTime
- index.js: // @ts-nocheckexport default { data: { ctx:'', ArrX:[], ArrY:[], // 开始时间 startTime:0, lineWidth:14 }, // 偏移很多 touchstart(e){ // 开始时间清空 this.startTime = 0 this.ArrX.push(e.touches[0].localX) this.ArrY.push(e.touches[0].localY) }, // 计算最后两点的速度 speed(x1,y1,x2,y2,s){ const x = Math.abs(x1-x2)*Math.abs(x1-x2) const y = Math.abs(y1-y2)*Math.abs(y1-y2) return Math.sqrt(x+y)/s }, touchmove(e){ // 计算线条粗细 const currTime = Date.now() if(this.startTime !== 0){ const duration = currTime - this.startTime // 传入倒数第二个点和最后一个点,和持续时间,会返回加速度 const v = this.speed(this.ArrX[this.ArrX.length-2],this.ArrY[this.ArrY.length-2],this.ArrX[this.ArrX.length-1],this.ArrY[this.ArrY.length-1],duration) this.lineWidth = this.lineWidth/v if(this.lineWidth>25){ this.lineWidth = 25 } if(this.lineWidth<1){ this.lineWidth = 1 } } this.startTime = currTime const el = this.$refs.canvas; this.ctx = el.getContext('2d') this.ctx.lineWidth =this.lineWidth/2 this.ctx.beginPath() // 向线条的每个末端添加圆形线帽。 this.ctx.lineCap = 'square' // 每次将数组中最后一个值取出,作为起始点 this.ctx.moveTo(this.ArrX[this.ArrX.length-1],this.ArrY[this.ArrY.length-1]) this.ctx.lineTo(e.touches[0].localX,e.touches[0].localY) this.ctx.stroke() this.ArrX.push(e.touches[0].localX) this.ArrY.push(e.touches[0].localY) }, touchend(e){ this.startTime = 0 }} index.hml: <div class="container"> <canvas ref="canvas" class="canvas" @touchstart="touchstart" @touchmove="touchmove" @touchend="touchend"/></div> index.css: .container{ margin: 50px;}.canvas{ height: 100%; width: 100%; background-color: #eee; border: 1px solid #ffc300;}
- 不足点:使用体验不是很好,后续还需要优化。 最后,通过自定义组件,加深对HarmonyOS的开发,共建鸿蒙生态! 想了解更多关于开源的内容,请访问: 51CTO 开源基础软件社区 https://ost.51cto.com。

最近在学习openHarmony,恰好之前了解过canvas,所以本篇文章分享一下我实现的一个手绘板,利用openHarmony内置的API cnavas组件实现。
这是一个手绘板,并且可以根据滑动屏幕速度,动态生成线条大小,当用户触摸屏幕,会生成线条,并且速度越快,线条越细。
使用前,需要线了解canvas组件,可以参考harmonyOS开发者文档,文档介绍的非常详细,这里就不多介绍了。
使用前,需要线了解canvas组件,可以参考harmonyOS开发者文档,文档介绍的非常详细,这里就不多介绍了。
首先,我们需要将canvas上下文对象,需要在触摸移动事件中绑定,因为我们是通过触摸来生成对应线条的。
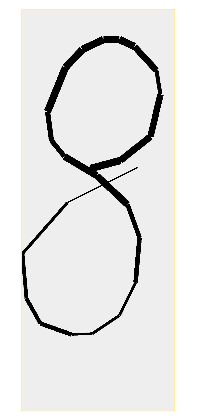
然后,属性选择lineCap,属性值有三种:butt、round、square,我尝试了后发现round效果比较好。
- 属性值为butt时的效果
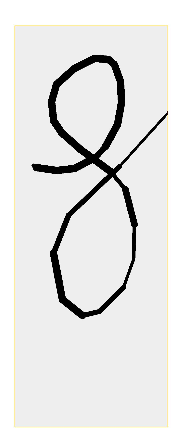
- 属性值为round
- 属性值为square
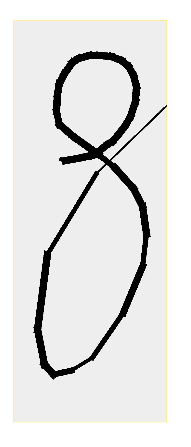
其实butt效果也还行,就是锯齿太严重,虽然API中有内置抗锯齿属性,但是不知道为啥设置了没有效果,可能粒度太大了,现在这个粒度已经有点卡了,如果把粒度小设置小一点估计更卡。
综上还是选择了round,它会将线端点以圆形结束,所以效果上更圆润。
最后将数组中的最后一个值取出,作为moveTo的坐标,将鼠标移动后的点作为lineTo的坐标,然后再通过stroke就能绘制出图像。
绘制直线,通常使用moveTo ()与lineTo ()两个方法。. moveTo ()方法用于将画笔移至指定点并以改点为直线的开始点,lineTo ()则为结束点。
const el = this.$refs.canvas;
 this.ctx = el.getContext('2d')
 this.ctx.lineWidth =this.lineWidth/2
 this.ctx.beginPath()
 // 向线条的每个末端添加圆形线帽。
 this.ctx.lineCap = 'square'
 // 每次将数组中最后一个值取出,作为起始点
 this.ctx.moveTo(this.ArrX[this.ArrX.length-1],this.ArrY[this.ArrY.length-1])
 this.ctx.lineTo(e.touches[0].localX,e.touches[0].localY)
 this.ctx.stroke()
 this.ArrX.push(e.touches[0].localX)
 this.ArrY.push(e.touches[0].localY)
想要通过速度来计算线条粗细,那么可以是需要获取两点之间的时间,通过时间和距离得到速度。
想要通过速度来计算线条粗细,那么可以是需要获取两点之间的时间,通过时间和距离得到速度。
当触发touchmove事件,将当前时间戳存储起来,通过上一次触发事件获得的时间-当前触发事件获得的时间,就可以得到两次触发事件的事件间隔,此时我们就获得了两点之间的时间。
再计算两点之间的距离(平方和再开根号),通过 路程/时间 = 速度计算出两点之间的速度,从而可以动态生成线条粗细。
// 计算线条粗细
 const currTime = Date.now()
 if(this.startTime !== 0){
 const duration = currTime - this.startTime
 // 传入倒数第二个点和最后一个点,和持续时间,会返回加速度
 const v = this.speed(this.ArrX[this.ArrX.length-2],this.ArrY[this.ArrY.length-2],this.ArrX[this.ArrX.length-1],this.ArrY[this.ArrY.length-1],duration)
 this.lineWidth = this.lineWidth/v
 if(this.lineWidth>25){
 this.lineWidth = 25
 }
 if(this.lineWidth<1){
 this.lineWidth = 1
 }
 }
 this.startTime = currTime
index.js:
// @ts-nocheck
export default {
 data: {
 ctx:'',
 ArrX:[],
 ArrY:[],
 // 开始时间
 startTime:0,
 lineWidth:14
 },
 // 偏移很多
 touchstart(e){
 // 开始时间清空
 this.startTime = 0
 this.ArrX.push(e.touches[0].localX)
 this.ArrY.push(e.touches[0].localY)
 },
 // 计算最后两点的速度
 speed(x1,y1,x2,y2,s){
 const x = Math.abs(x1-x2)*Math.abs(x1-x2)
 const y = Math.abs(y1-y2)*Math.abs(y1-y2)
 return Math.sqrt(x+y)/s
 },
 touchmove(e){
 // 计算线条粗细
 const currTime = Date.now()
 if(this.startTime !== 0){
 const duration = currTime - this.startTime
 // 传入倒数第二个点和最后一个点,和持续时间,会返回加速度
 const v = this.speed(this.ArrX[this.ArrX.length-2],this.ArrY[this.ArrY.length-2],this.ArrX[this.ArrX.length-1],this.ArrY[this.ArrY.length-1],duration)
 this.lineWidth = this.lineWidth/v
 if(this.lineWidth>25){
 this.lineWidth = 25
 }
 if(this.lineWidth<1){
 this.lineWidth = 1
 }
 }
 this.startTime = currTime
 const el = this.$refs.canvas;
 this.ctx = el.getContext('2d')
 this.ctx.lineWidth =this.lineWidth/2
 this.ctx.beginPath()
 // 向线条的每个末端添加圆形线帽。
 this.ctx.lineCap = 'square'
 // 每次将数组中最后一个值取出,作为起始点
 this.ctx.moveTo(this.ArrX[this.ArrX.length-1],this.ArrY[this.ArrY.length-1])
 this.ctx.lineTo(e.touches[0].localX,e.touches[0].localY)
 this.ctx.stroke()
 this.ArrX.push(e.touches[0].localX)
 this.ArrY.push(e.touches[0].localY)
 },
 touchend(e){
 this.startTime = 0
 }
}
index.hml:
<div class="container">
 <canvas ref="canvas" class="canvas" @touchstart="touchstart"
 @touchmove="touchmove" @touchend="touchend"/>
</div>
index.css:
.container{
 margin: 50px;
}
.canvas{
 height: 100%;
 width: 100%;
 background-color: #eee;
 border: 1px solid #ffc300;
}
不足点:使用体验不是很好,后续还需要优化。
最后,通过自定义组件,加深对HarmonyOS的开发,共建鸿蒙生态!
© 版权声明
文章版权归作者所有,未经允许请勿转载。