文章目录
-
- 新建项目所设定的包名就是后面在AGC创建项目所用到的包名。
-
- dependencies { /*工程自带*/ classpath 'com.huawei.ohos:hap:3.0.5.11' classpath 'com.huawei.ohos:decctest:1.2.7.9' classpath 'com.huawei.ohos:hap:2.4.4.2' /*要添加的项目: 添加agconnect服务依赖*/ classpath 'com.huawei.agconnect:agcp-harmony:1.0.0.300' }
- apply plugin: 'com.huawei.agconnect'dependencies { implementation fileTree(dir: 'libs', include: ['*.jar', '*.har']) testImplementation 'junit:junit:4.13.1' ohosTestImplementation 'com.huawei.ohos.testkit:runner:2.0.0.200' /*要添加的项目内容*/ implementation 'com.huawei.hms:jsb-ohos-adapter:5.3.0.303' implementation 'com.huawei.agconnect:agconnect-core-harmony:1.0.0.300'}
- 利用命令行窗口进入到项目工程的entry目录下。 输入以下命令进行安装。 npm install @hw-hmscore/hms-js-basenpm install @hmscore/hms-jsb-account
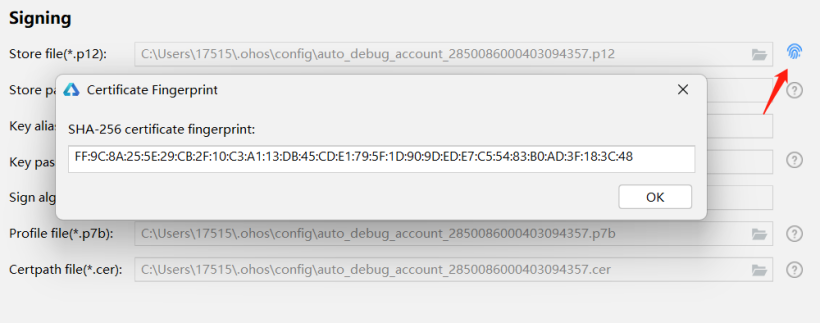
- AGC控制台 创建项目,注意包名一致,并且创建应用,进入项目界面,找到应用信息栏。 SHA256证书指纹,这里我们采用的是自动签名方式,打开工程项目进行自动签名。点击第一行最右侧的指纹按键可以获得SHA246证书指纹。 补充证书指纹进入到刚刚创建好的项目界面,找到应用信息的位置,补充证书指纹。 同时记录这里的Client ID(绿色框)
-
- 在module节点下增加以下内容,这里的ClientID就是不久前记录下的应用的ClientID。 "metaData": { "customizeData": [ { "name": "com.huawei.hms.client.appid", //value的值就是前文获得到的ClientID "value": "106712139" } ] },
- "deviceConfig": { "default": { "allowComponentsProxy": true } },
- 这里的权限不是集成HMS服务必备的,方便后续的案例实现。 "reqPermissions": [ { "name": "ohos.permission.GET_WIFI_INFO" }, { "name": "ohos.permission.GET_NETWORK_INFO" }, { "name": "ohos.permission.INTERNET" },{ "name": "ohos.permission.SET_NETWORK_INFO" }, { "name": "ohos.permission.LOCATION" }, { "name": "ohos.permission.LOCATION_IN_BACKGROUND" }, { "name": "ohos.permission.READ_MEDIA" } ]
- 在MainApplication中添加如下代码 package com.yzj.account;import com.huawei.hms.jsb.adapter.har.bridge.HmsBridge;import ohos.aafwk.ability.AbilityPackage;public class MyApplication extends AbilityPackage { private HmsBridge mHmsBridge; @Override public void onInitialize() { mHmsBridge = HmsBridge.getInstance(); mHmsBridge.initBridge(this); super.onInitialize(); } @Override public void onEnd() { // 结束JSB mHmsBridge.destoryBridge(); super.onEnd(); }} 重新编译工程项目,至此,HMS账号认证服务以及集成完毕。
-
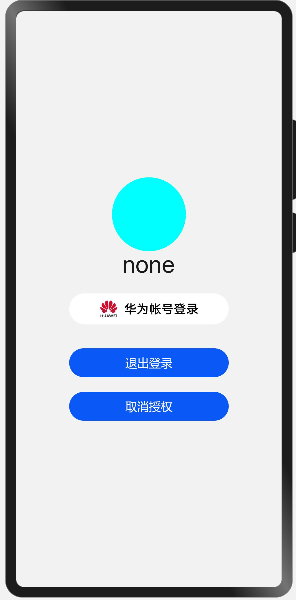
- 华为账号服务提供了几个重要的功能,账号授权,退出账号,取消授权。 这里简单设置一个头像框,昵称,以及三个按键。
- .container { display: flex; flex-direction: column; justify-content: center; align-items: center; left: 0px; top: 0px; width: 100%; height: 100%; background-color: #fff2f2f2;}.title { font-size: 40px; text-align: center; width: 100%; height: 40%; margin: 10px;}@media screen and (device-type: tablet) and (orientation: landscape) { .title { font-size: 100px; }}@media screen and (device-type: wearable) { .title { font-size: 28px; color: #FFFFFF; }}@media screen and (device-type: tv) { .container { background-image: url("/common/images/Wallpaper.png"); background-size: cover; background-repeat: no-repeat; background-position: center; } .title { font-size: 100px; color: #FFFFFF; }}@media screen and (device-type: phone) and (orientation: landscape) { .title { font-size: 60px; }}.account{ background-image: url('common/btn_hw+text_singin_light_normal.png'); background-repeat: no-repeat; background-size: 100%;} <div class="container"> <image id="header" shareid="img" style="width: 100px;height: 100px;border-radius: 50px ;background-color: aqua;"> </image> <text style="font-size: 32px;"> {{name}} </text> <text style="font-size: 32px;"> 姓氏: {{fname}} </text> <text style="font-size: 32px;"> 名字:{{rname}} </text> <text style="font-size: 32px;"> 邮箱: {{mail}} </text> <button class="account" style="width: 60%;height: 7%;margin-top: 20px;" onclick="signin"> </button> <button onclick="logout"type="capsule" style="width: 60%;height: 5%;margin-top: 20px"> 退出登录 </button> <button onclick="cancelauthorization"type="capsule" style="width: 60%;height: 5%;margin-top: 20px"> 取消授权 </button></div>
-
- result中有以下方法,注意到这里能够返回头像的下载链接,我们将其下载下来。 getDisplayName() 获取用户昵称。 getEmail() 获取用户的邮箱地址。 getGivenName() 获取用户的名字。 getFamilyName() 获取用户的姓氏。 getAvatarUri() 获取用户头像的URI地址 signin(){ var signInOption = new HuaweiIdAuthParamsHelper().setId().setProfile().setAuthorizationCode().build(); HuaweiIdAuthManager.getAuthApi().getSignInIntent(signInOption).then((result)=>{ // 登录成功,获取用户的华为帐号信息 console.info(this.TAG+"登录成功"); console.info(this.TAG+JSON.stringify(result)); console.info(this.TAG+"账号名称: " + result.getDisplayName()); console.info(this.TAG+"头像: " + result.getAvatarUri()); console.info(this.TAG+"姓"+result.getFamilyName()); console.info(this.TAG+"名字"+result.getGivenName()); console.info(this.TAG+"邮箱:"+result.getEmail()); this.name=result.getDisplayName(); this.fname=result.getFamilyName(); this.rname=result.getGivenName() this.mail=JSON.stringify(result.getEmail()); this.download(result.getAvatarUri()); }).catch((error)=>{ // 登录失败 console.error(this.TAG+"登录失败"); console.error(this.TAG+JSON.stringify(error)); }); },
- 路径下载到应用沙盒中,由于文件管理API暂未完全开放,还不能够直接将下载的头像设置进来,暂且用来判断是否获取成功。 download(add){ let downloadTask; request.download({ url: add ,filepath:"/data/data/com.yzj.account/files/head.jpg"}).then((data) => { downloadTask = data; console.info(this.TAG+"正在下载"+JSON.stringify(data)) }).catch((err) => { console.error('Failed to request the download. Cause: ' + JSON.stringify(err)); }) },
- logout(){ HuaweiIdAuthManager.getAuthApi().signOut().then((result)=>{ //帐号退出成功 console.info(this.TAG+"退出成功"); console.info(this.TAG+JSON.stringify(result)); }).catch((error) => { //帐号退出失败 console.error(this.TAG+"退出失败"); console.error(this.TAG+JSON.stringify(error)); }); },
- cancelauthorization() { HuaweiIdAuthManager.getAuthApi().cancelAuthorization().then((result)=>{ // 帐号取消授权成功 console.info(this.TAG+"取消授权成功"); console.info(this.TAG+JSON.stringify(result)); }).catch((error) => { // 帐号取消授权失败 console.error(this.TAG+"取消授权失败"); console.error(this.TAG+JSON.stringify(error)); }); },
- 账号授权,便于在实际开发中提供便捷的登录方式。碍于目前API功能未完全开放,否则可以直接生成账号界面。期待HarmonyOS3.0的到来。 文章相关附件可以点击下面的原文链接前往下载。 https://ost.51cto.com/resource/2187。 想了解更多关于开源的内容,请访问: 51CTO 开源基础软件社区 https://ost.51cto.com。

新建项目所设定的包名就是后面在AGC创建项目所用到的包名。
dependencies {
 /*工程自带*/
 classpath 'com.huawei.ohos:hap:3.0.5.11'
 classpath 'com.huawei.ohos:decctest:1.2.7.9'
 classpath 'com.huawei.ohos:hap:2.4.4.2'

 /*要添加的项目: 添加agconnect服务依赖*/
 classpath 'com.huawei.agconnect:agcp-harmony:1.0.0.300'
 }
/*工程自带*/
classpath 'com.huawei.ohos:hap:3.0.5.11'
classpath 'com.huawei.ohos:decctest:1.2.7.9'
classpath 'com.huawei.ohos:hap:2.4.4.2'
/*要添加的项目: 添加agconnect服务依赖*/
classpath 'com.huawei.agconnect:agcp-harmony:1.0.0.300'
}
apply plugin: 'com.huawei.agconnect'
dependencies {
 implementation fileTree(dir: 'libs', include: ['*.jar', '*.har'])
 testImplementation 'junit:junit:4.13.1'
 ohosTestImplementation 'com.huawei.ohos.testkit:runner:2.0.0.200'

 /*要添加的项目内容*/
 implementation 'com.huawei.hms:jsb-ohos-adapter:5.3.0.303'
 implementation 'com.huawei.agconnect:agconnect-core-harmony:1.0.0.300'
}
dependencies {
implementation fileTree(dir: 'libs', include: ['*.jar', '*.har'])
testImplementation 'junit:junit:4.13.1'
ohosTestImplementation 'com.huawei.ohos.testkit:runner:2.0.0.200'
/*要添加的项目内容*/
implementation 'com.huawei.hms:jsb-ohos-adapter:5.3.0.303'
implementation 'com.huawei.agconnect:agconnect-core-harmony:1.0.0.300'
}
利用命令行窗口进入到项目工程的entry目录下。
输入以下命令进行安装。
npm install @hw-hmscore/hms-js-base
npm install @hmscore/hms-jsb-account
AGC控制台
- 创建项目,注意包名一致,并且创建应用,进入项目界面,找到应用信息栏。
- SHA256证书指纹,这里我们采用的是自动签名方式,打开工程项目进行自动签名。点击第一行最右侧的指纹按键可以获得SHA246证书指纹。
- 补充证书指纹
进入到刚刚创建好的项目界面,找到应用信息的位置,补充证书指纹。
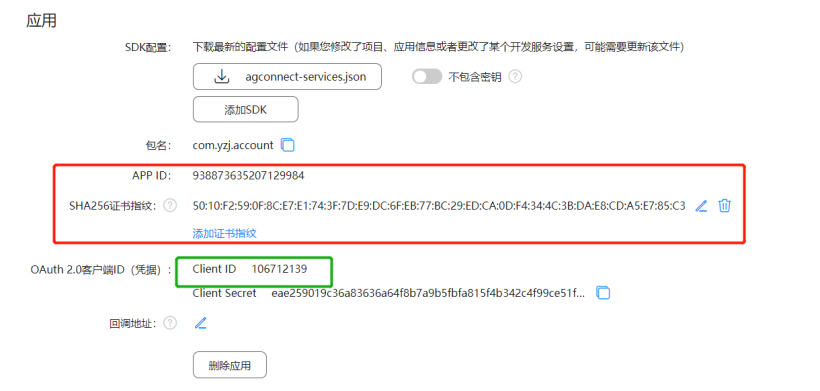
- 同时记录这里的Client ID(绿色框)
在module节点下增加以下内容,这里的ClientID就是不久前记录下的应用的ClientID。
"metaData": {
 "customizeData": [
 {
 "name": "com.huawei.hms.client.appid",
 //value的值就是前文获得到的ClientID
 "value": "106712139"
 }
 ]
 },
"deviceConfig": {
 "default": {
 "allowComponentsProxy": true
 }
 },
"default": {
"allowComponentsProxy": true
}
},
这里的权限不是集成HMS服务必备的,方便后续的案例实现。
"reqPermissions": [
 {
 "name": "ohos.permission.GET_WIFI_INFO"
 },
 {
 "name": "ohos.permission.GET_NETWORK_INFO"
 },
 {
 "name": "ohos.permission.INTERNET"
 },{
 "name": "ohos.permission.SET_NETWORK_INFO"
 },
 {
 "name": "ohos.permission.LOCATION"
 },
 {
 "name": "ohos.permission.LOCATION_IN_BACKGROUND"
 },
 {
 "name": "ohos.permission.READ_MEDIA"
 }
 ]
- 在MainApplication中添加如下代码
package com.yzj.account;

import com.huawei.hms.jsb.adapter.har.bridge.HmsBridge;
import ohos.aafwk.ability.AbilityPackage;

public class MyApplication extends AbilityPackage {
 private HmsBridge mHmsBridge;
 @Override
 public void onInitialize() {
 mHmsBridge = HmsBridge.getInstance();
 mHmsBridge.initBridge(this);
 super.onInitialize();
 }
 @Override
 public void onEnd() {
 // 结束JSB
 mHmsBridge.destoryBridge();
 super.onEnd();
 }
}
重新编译工程项目,至此,HMS账号认证服务以及集成完毕。
import com.huawei.hms.jsb.adapter.har.bridge.HmsBridge;
import ohos.aafwk.ability.AbilityPackage;
public class MyApplication extends AbilityPackage {
private HmsBridge mHmsBridge;
@Override
public void onInitialize() {
mHmsBridge = HmsBridge.getInstance();
mHmsBridge.initBridge(this);
super.onInitialize();
}
@Override
public void onEnd() {
// 结束JSB
mHmsBridge.destoryBridge();
super.onEnd();
}
}
重新编译工程项目,至此,HMS账号认证服务以及集成完毕。
华为账号服务提供了几个重要的功能,账号授权,退出账号,取消授权。
这里简单设置一个头像框,昵称,以及三个按键。
.container {
 display: flex;
 flex-direction: column;
 justify-content: center;
 align-items: center;
 left: 0px;
 top: 0px;
 width: 100%;
 height: 100%;
 background-color: #fff2f2f2;
}
.title {
 font-size: 40px;
 text-align: center;
 width: 100%;
 height: 40%;
 margin: 10px;
}
@media screen and (device-type: tablet) and (orientation: landscape) {
 .title {
 font-size: 100px;
 }
}
@media screen and (device-type: wearable) {
 .title {
 font-size: 28px;
 color: #FFFFFF;
 }
}
@media screen and (device-type: tv) {
 .container {
 background-image: url("/common/images/Wallpaper.png");
 background-size: cover;
 background-repeat: no-repeat;
 background-position: center;
 }
 .title {
 font-size: 100px;
 color: #FFFFFF;
 }
}
@media screen and (device-type: phone) and (orientation: landscape) {
 .title {
 font-size: 60px;
 }
}
.account{
 background-image: url('common/btn_hw+text_singin_light_normal.png');
 background-repeat: no-repeat;
 background-size: 100%;
}
<div class="container">
 <image id="header" shareid="img" style="width: 100px;height: 100px;border-radius: 50px ;background-color: aqua;">
 </image>
 <text style="font-size: 32px;">
 {{name}}
 </text>
 <text style="font-size: 32px;">
 姓氏: {{fname}}
 </text>
 <text style="font-size: 32px;">
 名字:{{rname}}
 </text>
 <text style="font-size: 32px;">
 邮箱: {{mail}}
 </text>
 <button class="account" style="width: 60%;height: 7%;margin-top: 20px;" onclick="signin">
 </button>
 <button onclick="logout"type="capsule" style="width: 60%;height: 5%;margin-top: 20px">
 退出登录
 </button>
 <button onclick="cancelauthorization"type="capsule" style="width: 60%;height: 5%;margin-top: 20px">
 取消授权
 </button>
</div>
display: flex;
flex-direction: column;
justify-content: center;
align-items: center;
left: 0px;
top: 0px;
width: 100%;
height: 100%;
background-color: #fff2f2f2;
}
.title {
font-size: 40px;
text-align: center;
width: 100%;
height: 40%;
margin: 10px;
}
@media screen and (device-type: tablet) and (orientation: landscape) {
.title {
font-size: 100px;
}
}
@media screen and (device-type: wearable) {
.title {
font-size: 28px;
color: #FFFFFF;
}
}
@media screen and (device-type: tv) {
.container {
background-image: url("/common/images/Wallpaper.png");
background-size: cover;
background-repeat: no-repeat;
background-position: center;
}
.title {
font-size: 100px;
color: #FFFFFF;
}
}
@media screen and (device-type: phone) and (orientation: landscape) {
.title {
font-size: 60px;
}
}
.account{
background-image: url('common/btn_hw+text_singin_light_normal.png');
background-repeat: no-repeat;
background-size: 100%;
}
<image id="header" shareid="img" style="width: 100px;height: 100px;border-radius: 50px ;background-color: aqua;">
</image>
<text style="font-size: 32px;">
{{name}}
</text>
<text style="font-size: 32px;">
姓氏: {{fname}}
</text>
<text style="font-size: 32px;">
名字:{{rname}}
</text>
<text style="font-size: 32px;">
邮箱: {{mail}}
</text>
<button class="account" style="width: 60%;height: 7%;margin-top: 20px;" onclick="signin">
</button>
<button onclick="logout"type="capsule" style="width: 60%;height: 5%;margin-top: 20px">
退出登录
</button>
<button onclick="cancelauthorization"type="capsule" style="width: 60%;height: 5%;margin-top: 20px">
取消授权
</button>
</div>
result中有以下方法,注意到这里能够返回头像的下载链接,我们将其下载下来。
|
getDisplayName() |
获取用户昵称。 |
|
getEmail() |
获取用户的邮箱地址。 |
|
getGivenName() |
获取用户的名字。 |
|
getFamilyName() |
获取用户的姓氏。 |
|
getAvatarUri() |
获取用户头像的URI地址 |
signin(){
 var signInOption = new HuaweiIdAuthParamsHelper().setId().setProfile().setAuthorizationCode().build();
 HuaweiIdAuthManager.getAuthApi().getSignInIntent(signInOption).then((result)=>{
 // 登录成功,获取用户的华为帐号信息
 console.info(this.TAG+"登录成功");
 console.info(this.TAG+JSON.stringify(result));
 console.info(this.TAG+"账号名称: " + result.getDisplayName());
 console.info(this.TAG+"头像: " + result.getAvatarUri());
 console.info(this.TAG+"姓"+result.getFamilyName());
 console.info(this.TAG+"名字"+result.getGivenName());
 console.info(this.TAG+"邮箱:"+result.getEmail());

 this.name=result.getDisplayName();
 this.fname=result.getFamilyName();
 this.rname=result.getGivenName()
 this.mail=JSON.stringify(result.getEmail());
 this.download(result.getAvatarUri());
 }).catch((error)=>{
 // 登录失败
 console.error(this.TAG+"登录失败");
 console.error(this.TAG+JSON.stringify(error));
 });
 },
路径下载到应用沙盒中,由于文件管理API暂未完全开放,还不能够直接将下载的头像设置进来,暂且用来判断是否获取成功。
download(add){
 let downloadTask;
 request.download({ url: add ,filepath:"/data/data/com.yzj.account/files/head.jpg"}).then((data) => {
 downloadTask = data;
 console.info(this.TAG+"正在下载"+JSON.stringify(data))
 }).catch((err) => {
 console.error('Failed to request the download. Cause: ' + JSON.stringify(err));
 })
 },
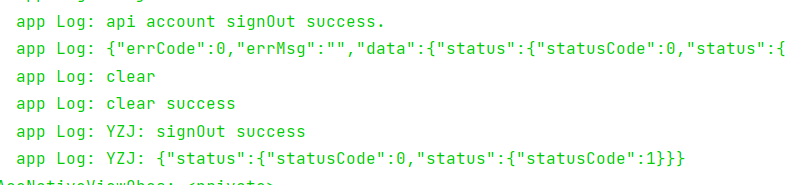
logout(){
 HuaweiIdAuthManager.getAuthApi().signOut().then((result)=>{
 //帐号退出成功
 console.info(this.TAG+"退出成功");
 console.info(this.TAG+JSON.stringify(result));
 }).catch((error) => {
 //帐号退出失败
 console.error(this.TAG+"退出失败");
 console.error(this.TAG+JSON.stringify(error));
 });

 },
HuaweiIdAuthManager.getAuthApi().signOut().then((result)=>{
//帐号退出成功
console.info(this.TAG+"退出成功");
console.info(this.TAG+JSON.stringify(result));
}).catch((error) => {
//帐号退出失败
console.error(this.TAG+"退出失败");
console.error(this.TAG+JSON.stringify(error));
});
},
cancelauthorization()
 {
 HuaweiIdAuthManager.getAuthApi().cancelAuthorization().then((result)=>{
 // 帐号取消授权成功
 console.info(this.TAG+"取消授权成功");
 console.info(this.TAG+JSON.stringify(result));
 }).catch((error) => {
 // 帐号取消授权失败
 console.error(this.TAG+"取消授权失败");
 console.error(this.TAG+JSON.stringify(error));
 });
 },
{
HuaweiIdAuthManager.getAuthApi().cancelAuthorization().then((result)=>{
// 帐号取消授权成功
console.info(this.TAG+"取消授权成功");
console.info(this.TAG+JSON.stringify(result));
}).catch((error) => {
// 帐号取消授权失败
console.error(this.TAG+"取消授权失败");
console.error(this.TAG+JSON.stringify(error));
});
},

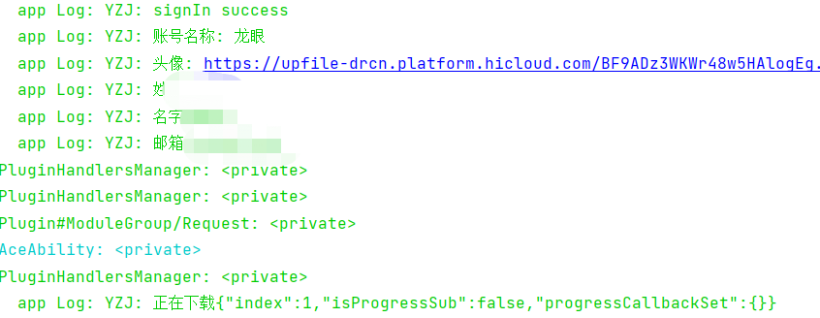
可以看到,账号名称,姓名,头像等信息均已获取到。
退出成功

账号授权,便于在实际开发中提供便捷的登录方式。碍于目前API功能未完全开放,否则可以直接生成账号界面。期待HarmonyOS3.0的到来。
文章相关附件可以点击下面的原文链接前往下载。
https://ost.51cto.com/resource/2187。
© 版权声明
文章版权归作者所有,未经允许请勿转载。