文章目录
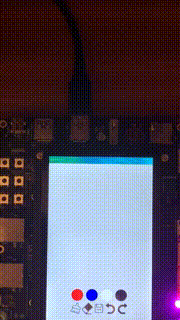
- 这是一个绘画板,我们可以实现简单的绘画,功能包括:画笔颜色切换、清空、橡皮擦、保存、撤回、反撤回
-
- 这是最基础的功能,具体实现方法,前面的文章也介绍过。 首先,我们需要将canvas上下文对象,需要在触摸移动事件中绑定,因为我们是通过触摸来生成对应线条的。 然后,定义两个数组,分别存储鼠标经过的x与y坐标,在鼠标按下时开始记录,在鼠标移动时,也将坐标push到数组中。 最后,将获取的坐标通过绘画方法,通过moveTo和lineTo进行绘画,即可得到线条。 // 绘画函数 lineDraw(e){ this.ctx.lineWidth = this.lineWidth this.ctx.strokeStyle = this.strokeStyle this.ctx.beginPath() // 向线条的每个末端添加圆形线帽。 this.ctx.lineCap ='round' // 每次将数组中最后一个值取出,作为起始点 this.ctx.moveTo(this.ArrX[this.ArrX.length-1],this.ArrY[this.ArrY.length-1]) this.ctx.lineTo(e.touches[0].localX,e.touches[0].localY) this.ctx.stroke() }
- 清空画布的功能最简单,调用canvasAPI的ctx.clearRect即可。 API介绍:clearRect(x: number, y: number, w: number, h: number): void。 x:指定矩形上的左上角x坐标。 y:指定矩形上的左上角y坐标。 width:指定矩形的宽度。 height:指定矩形的高度。 这里因为是清空,所以只需要将在坐标设置为左上角,然后宽高设置为和当前canvs画布宽高一致即可清空画板。 // width和height为获取的canvas宽高 clearBtn(e){ this.ctx.clearRect(0, 0, this.width, this.height); }
- 这里的实现实际和清空画板一样,只是橡皮擦清空的面积小很多。 首先,定义一个标识,来判断是否需要橡皮擦功能,用户通过点击下面的橡皮擦图片进行控制。 然后,我们需要在触摸移动事件,提前判断是否需要橡皮擦功能,如果需要,我们将画线功能替换为橡皮擦功能,功能实现的API和清空画板一样。 最后,就是橡皮擦大小的问题,我们可以提前定义一个属性,用来控制大小,在橡皮擦功能中,将该属性添加即可。 touchmove(e){ if(this.isEraser){ this.ctx.clearRect(this.ArrX[this.ArrX.length-1]-this.eraserValue,this.ArrY[this.ArrY.length-1]-this.eraserValue,this.eraserValue,this.eraserValue) }else{ this.lineDraw(e) } this.ArrX.push(e.touches[0].localX) this.ArrY.push(e.touches[0].localY) }
- 这里还没实现出来。 这里利用了canvas的一个API:toDataURL(type?: string, quality?:number)。 可以生成一个包含图片展示的URL。 参数: type: 可选参数,用于指定图像格式,默认格式为image/png、。 quality:在指定图片格式为image/jpeg或image/webp的情况下,可以从0到1的区间内选择图片的质量。如果超出取值范围,将会使用默认值0.92。 返回值: string:图像的URL地址。 我们可以通过toDataURL将获取到的图像的URL地址进行存储,在需要的地方生成canvas图像即可。 saveBtn(){ const el = this.$refs.canvas; const dataURL = el.toDataURL(); console.log(dataURL); }
- 撤回功能用到的API比较多,需要耐心的阅读文档。 在实现撤回功能之前,我们需要将每次绘画出来的线条进行存储,在鼠标抬起事件中,通过toDataURL()将获取到当前的图像,push到数组中,存储起来。 实现撤回功能: 首先,需要一个属性:步频,我们每次绘画一条线段,step就自增,撤回功能中,只需要将当前步频-1,就能拿到上一次绘画的图像。 然后,将当前的图像清空,通过clearRect。 最后,拿到上一次的图像,通过onload函数,将图像进行绘画,通过drawImage实现绘画功能。
- 反撤回的实现基本上和撤回一样,只不过获取的图像不同。 和撤回一样,需要拿到每次的图像,这里可以直接利用撤回中获取的图像。 实现反撤回功能: 首先,每次反撤回,需要将步频++,我们就可以拿到当前显示画像的前一张画画像。 然后,将当前的图像清空,通过clearRect。 最后,拿到上一次的图像,通过onload函数,将图像进行绘画,通过drawImage实现绘画功能。
- 线条颜色实现比较简单,当用户点击需要的颜色样式时,修改画布的ctx.strokeStyle即可。
- index.js: // @ts-nocheckexport default { data: { ctx:'', width:0, height:0, ArrX:[], ArrY:[], lineWidth:14, isEraser:false,//是否开启橡皮擦功能 eraserValue:30,//橡皮擦大小 strokeStyle:'black', canvasHistory:[], step:-1, showClear:true, showEraser:true, showSave:true, showUndo:true, showRedo:true }, onLayoutReady(){ const el = this.$refs.canvas; this.ctx = el.getContext('2d') this.width = el.getBoundingClientRect().width; this.height = el.getBoundingClientRect().height; }, // 偏移很多 touchstart(e){ this.ArrX.push(e.touches[0].localX) this.ArrY.push(e.touches[0].localY) if(this.isEraser){ this.ctx.clearRect(e.touches[0].localX-this.eraserValue,e.touches[0].localY-this.eraserValue,this.eraserValue,this.eraserValue) } }, touchmove(e){ if(this.isEraser){ this.ctx.clearRect(this.ArrX[this.ArrX.length-1]-this.eraserValue,this.ArrY[this.ArrY.length-1]-this.eraserValue,this.eraserValue,this.eraserValue) }else{ this.lineDraw(e) } this.ArrX.push(e.touches[0].localX) this.ArrY.push(e.touches[0].localY) }, lineDraw(e){ this.ctx.lineWidth = this.lineWidth this.ctx.strokeStyle = this.strokeStyle this.ctx.beginPath() // 向线条的每个末端添加圆形线帽。 this.ctx.lineCap ='round' // 每次将数组中最后一个值取出,作为起始点 this.ctx.moveTo(this.ArrX[this.ArrX.length-1],this.ArrY[this.ArrY.length-1]) this.ctx.lineTo(e.touches[0].localX,e.touches[0].localY) this.ctx.stroke() }, touchend(e){ const el = this.$refs.canvas; this.step++; this.canvasHistory.push(el.toDataURL()); // 添加新的绘制到历史记录 console.log(this.step) }, saveBtn(){ const el = this.$refs.canvas; const dataURL = el.toDataURL(); console.log(dataURL); }, withdraw(){ this.ArrX.pop() this.ArrY.pop() }, clearBtn(e){ this.ctx.clearRect(0, 0, this.width, this.height); this.showClear = false this.showEraser=true this.showSave=true this.showUndo=true this.showRedo=true }, clearBtnEnd(){ this.showClear = true }, EraserBtn(){ this.isEraser = !this.isEraser this.showClear = true this.showEraser=!this.showEraser this.showSave=true this.showUndo=true this.showRedo=true }, saveBtn(){ this.showClear = true this.showEraser=true this.showSave=false this.showUndo=true this.showRedo=true }, saveBtnEnd(){ this.showClear = true this.showEraser=true this.showSave=true this.showUndo=true this.showRedo=true }, red(){ this.strokeStyle = 'red' }, blue(){ this.strokeStyle = 'blue' }, white(){ this.strokeStyle = 'white' }, black(){ this.strokeStyle = 'black' }, undo(){ if (this.step >= 0) { this.step--; this.ctx.clearRect(0, 0, this.width, this.height); let img = new Image(); img.src = this.canvasHistory[this.step]; let that = this img.onload = function() { // 画上图片 that.ctx.drawImage(canvasPic, 0, 0); }; } else { console.log('不能再继续撤销了'); } this.showClear = true this.showEraser=true this.showSave=true this.showUndo=false this.showRedo=true }, undoEnd(){ this.showClear = true this.showEraser=true this.showSave=true this.showUndo=true this.showRedo=true }, redo(){ if (this.step < this.canvasHistory.length - 1) { this.step++; let img = new Image(); img.src = this.canvasHistory[this.step]; let that = this img.onload = function() { that.ctx.clearRect(0, 0, this.width, this.height); that.ctx.drawImage(canvasPic, 0, 0); }; } else { console.log('已经是最新的记录了'); } this.showClear = true this.showEraser=true this.showSave=true this.showUndo=true this.showRedo=false }, redoEnd(){ this.showClear = true this.showEraser=true this.showSave=true this.showUndo=true this.showRedo=true }}
- 不足点: 保存功能还没完全完成。 绘制的曲线并不是很好看,优化方案:添加贝赛尔曲线。 贝赛尔曲线是用来绘制曲线的,一般的矢量图形软件通过它来精确画出曲线。 最后,这个canvasAPI实在有点多,需要耐心点看,在读OpenHarmony官方文档时,还发现两处问题,提了两个issure。 文章相关附件可以点击下面的原文链接前往下载: https://ost.51cto.com/resource/2231。 想了解更多关于开源的内容,请访问: 51CTO 开源基础软件社区 https://ost.51cto.com。

这是一个绘画板,我们可以实现简单的绘画,功能包括:画笔颜色切换、清空、橡皮擦、保存、撤回、反撤回
这是最基础的功能,具体实现方法,前面的文章也介绍过。
这是最基础的功能,具体实现方法,前面的文章也介绍过。
首先,我们需要将canvas上下文对象,需要在触摸移动事件中绑定,因为我们是通过触摸来生成对应线条的。
然后,定义两个数组,分别存储鼠标经过的x与y坐标,在鼠标按下时开始记录,在鼠标移动时,也将坐标push到数组中。
最后,将获取的坐标通过绘画方法,通过moveTo和lineTo进行绘画,即可得到线条。
// 绘画函数
 lineDraw(e){
 this.ctx.lineWidth = this.lineWidth
 this.ctx.strokeStyle = this.strokeStyle
 this.ctx.beginPath()
 // 向线条的每个末端添加圆形线帽。
 this.ctx.lineCap ='round'
 // 每次将数组中最后一个值取出,作为起始点
 this.ctx.moveTo(this.ArrX[this.ArrX.length-1],this.ArrY[this.ArrY.length-1])
 this.ctx.lineTo(e.touches[0].localX,e.touches[0].localY)
 this.ctx.stroke()
 }
清空画布的功能最简单,调用canvasAPI的ctx.clearRect即可。
API介绍:clearRect(x: number, y: number, w: number, h: number): void。
- x:指定矩形上的左上角x坐标。
- y:指定矩形上的左上角y坐标。
- width:指定矩形的宽度。
- height:指定矩形的高度。
这里因为是清空,所以只需要将在坐标设置为左上角,然后宽高设置为和当前canvs画布宽高一致即可清空画板。
// width和height为获取的canvas宽高
 clearBtn(e){
 this.ctx.clearRect(0, 0, this.width, this.height);
 }
这里的实现实际和清空画板一样,只是橡皮擦清空的面积小很多。
这里的实现实际和清空画板一样,只是橡皮擦清空的面积小很多。
首先,定义一个标识,来判断是否需要橡皮擦功能,用户通过点击下面的橡皮擦图片进行控制。
然后,我们需要在触摸移动事件,提前判断是否需要橡皮擦功能,如果需要,我们将画线功能替换为橡皮擦功能,功能实现的API和清空画板一样。
最后,就是橡皮擦大小的问题,我们可以提前定义一个属性,用来控制大小,在橡皮擦功能中,将该属性添加即可。
touchmove(e){
 if(this.isEraser){
 this.ctx.clearRect(this.ArrX[this.ArrX.length-1]-this.eraserValue,this.ArrY[this.ArrY.length-1]-this.eraserValue,this.eraserValue,this.eraserValue)
 }else{
 this.lineDraw(e)
 }
 this.ArrX.push(e.touches[0].localX)
 this.ArrY.push(e.touches[0].localY)
 }
这里还没实现出来。
这里还没实现出来。
这里利用了canvas的一个API:toDataURL(type?: string, quality?:number)。
可以生成一个包含图片展示的URL。
参数:
- type: 可选参数,用于指定图像格式,默认格式为image/png、。
- quality:在指定图片格式为image/jpeg或image/webp的情况下,可以从0到1的区间内选择图片的质量。如果超出取值范围,将会使用默认值0.92。
返回值:
- string:图像的URL地址。
我们可以通过toDataURL将获取到的图像的URL地址进行存储,在需要的地方生成canvas图像即可。
saveBtn(){
 const el = this.$refs.canvas;
 const dataURL = el.toDataURL();
 console.log(dataURL);
 }
撤回功能用到的API比较多,需要耐心的阅读文档。
撤回功能用到的API比较多,需要耐心的阅读文档。
在实现撤回功能之前,我们需要将每次绘画出来的线条进行存储,在鼠标抬起事件中,通过toDataURL()将获取到当前的图像,push到数组中,存储起来。
实现撤回功能:
首先,需要一个属性:步频,我们每次绘画一条线段,step就自增,撤回功能中,只需要将当前步频-1,就能拿到上一次绘画的图像。
然后,将当前的图像清空,通过clearRect。
最后,拿到上一次的图像,通过onload函数,将图像进行绘画,通过drawImage实现绘画功能。
反撤回的实现基本上和撤回一样,只不过获取的图像不同。
反撤回的实现基本上和撤回一样,只不过获取的图像不同。
和撤回一样,需要拿到每次的图像,这里可以直接利用撤回中获取的图像。
实现反撤回功能:
首先,每次反撤回,需要将步频++,我们就可以拿到当前显示画像的前一张画画像。
然后,将当前的图像清空,通过clearRect。
最后,拿到上一次的图像,通过onload函数,将图像进行绘画,通过drawImage实现绘画功能。
线条颜色实现比较简单,当用户点击需要的颜色样式时,修改画布的ctx.strokeStyle即可。
index.js:
// @ts-nocheck
export default {
 data: {
 ctx:'',
 width:0,
 height:0,
 ArrX:[],
 ArrY:[],
 lineWidth:14,
 isEraser:false,//是否开启橡皮擦功能
 eraserValue:30,//橡皮擦大小
 strokeStyle:'black',
 canvasHistory:[],
 step:-1,
 showClear:true,
 showEraser:true,
 showSave:true,
 showUndo:true,
 showRedo:true
 },
 onLayoutReady(){
 const el = this.$refs.canvas;
 this.ctx = el.getContext('2d')
 this.width = el.getBoundingClientRect().width;
 this.height = el.getBoundingClientRect().height;
 },
 // 偏移很多
 touchstart(e){
 this.ArrX.push(e.touches[0].localX)
 this.ArrY.push(e.touches[0].localY)
 if(this.isEraser){
 this.ctx.clearRect(e.touches[0].localX-this.eraserValue,e.touches[0].localY-this.eraserValue,this.eraserValue,this.eraserValue)
 }
 },
 touchmove(e){
 if(this.isEraser){
 this.ctx.clearRect(this.ArrX[this.ArrX.length-1]-this.eraserValue,this.ArrY[this.ArrY.length-1]-this.eraserValue,this.eraserValue,this.eraserValue)
 }else{
 this.lineDraw(e)
 }
 this.ArrX.push(e.touches[0].localX)
 this.ArrY.push(e.touches[0].localY)
 },
 lineDraw(e){
 this.ctx.lineWidth = this.lineWidth
 this.ctx.strokeStyle = this.strokeStyle
 this.ctx.beginPath()
 // 向线条的每个末端添加圆形线帽。
 this.ctx.lineCap ='round'
 // 每次将数组中最后一个值取出,作为起始点
 this.ctx.moveTo(this.ArrX[this.ArrX.length-1],this.ArrY[this.ArrY.length-1])
 this.ctx.lineTo(e.touches[0].localX,e.touches[0].localY)
 this.ctx.stroke()
 },
 touchend(e){
 const el = this.$refs.canvas;
 this.step++;
 this.canvasHistory.push(el.toDataURL()); // 添加新的绘制到历史记录
 console.log(this.step)
 },
 saveBtn(){
 const el = this.$refs.canvas;
 const dataURL = el.toDataURL();
 console.log(dataURL);
 },
 withdraw(){
 this.ArrX.pop()
 this.ArrY.pop()
 },
 clearBtn(e){
 this.ctx.clearRect(0, 0, this.width, this.height);
 this.showClear = false
 this.showEraser=true
 this.showSave=true
 this.showUndo=true
 this.showRedo=true
 },
 clearBtnEnd(){
 this.showClear = true
 },
 EraserBtn(){
 this.isEraser = !this.isEraser
 this.showClear = true
 this.showEraser=!this.showEraser
 this.showSave=true
 this.showUndo=true
 this.showRedo=true
 },
 saveBtn(){
 this.showClear = true
 this.showEraser=true
 this.showSave=false
 this.showUndo=true
 this.showRedo=true
 },
 saveBtnEnd(){
 this.showClear = true
 this.showEraser=true
 this.showSave=true
 this.showUndo=true
 this.showRedo=true
 },
 red(){
 this.strokeStyle = 'red'
 },
 blue(){
 this.strokeStyle = 'blue'
 },
 white(){
 this.strokeStyle = 'white'
 },
 black(){
 this.strokeStyle = 'black'
 },
 undo(){
 if (this.step >= 0) {
 this.step--;
 this.ctx.clearRect(0, 0, this.width, this.height);
 let img = new Image();
 img.src = this.canvasHistory[this.step];
 let that = this
 img.onload = function() {
 // 画上图片
 that.ctx.drawImage(canvasPic, 0, 0);
 };
 } else {
 console.log('不能再继续撤销了');
 }
 this.showClear = true
 this.showEraser=true
 this.showSave=true
 this.showUndo=false
 this.showRedo=true
 },
 undoEnd(){
 this.showClear = true
 this.showEraser=true
 this.showSave=true
 this.showUndo=true
 this.showRedo=true
 },
 redo(){
 if (this.step < this.canvasHistory.length - 1) {
 this.step++;
 let img = new Image();
 img.src = this.canvasHistory[this.step];
 let that = this
 img.onload = function() {
 that.ctx.clearRect(0, 0, this.width, this.height);
 that.ctx.drawImage(canvasPic, 0, 0);
 };
 } else {
 console.log('已经是最新的记录了');
 }
 this.showClear = true
 this.showEraser=true
 this.showSave=true
 this.showUndo=true
 this.showRedo=false
 },
 redoEnd(){
 this.showClear = true
 this.showEraser=true
 this.showSave=true
 this.showUndo=true
 this.showRedo=true
 }
}
不足点:
- 保存功能还没完全完成。
- 绘制的曲线并不是很好看,优化方案:添加贝赛尔曲线。
贝赛尔曲线是用来绘制曲线的,一般的矢量图形软件通过它来精确画出曲线。
最后,这个canvasAPI实在有点多,需要耐心点看,在读OpenHarmony官方文档时,还发现两处问题,提了两个issure。
文章相关附件可以点击下面的原文链接前往下载:
https://ost.51cto.com/resource/2231。
© 版权声明
文章版权归作者所有,未经允许请勿转载。