
文章目录
- 原本打算在九联开发板上搭配摄像头开发,去实现拍照并对图片进行AI识别的应用开发,但是遇到了点问题。 不过基于HarmonyOS的AI图像识别案例可以正常运作,于是作此文章作为小分享O(∩_∩)O。
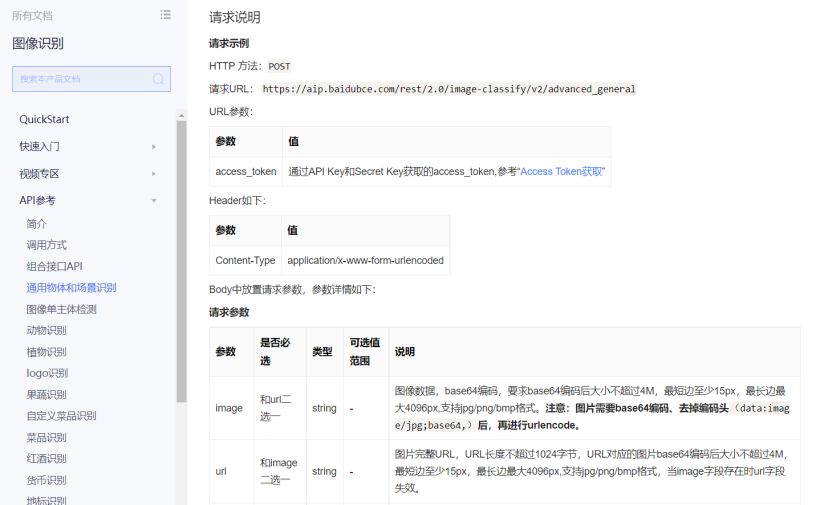
- 本案例是通过网络请求连接到百度云,调用百度云AI图像识别的API,再将结果返回至应用显示。百度云文档。 举例效果图:
-
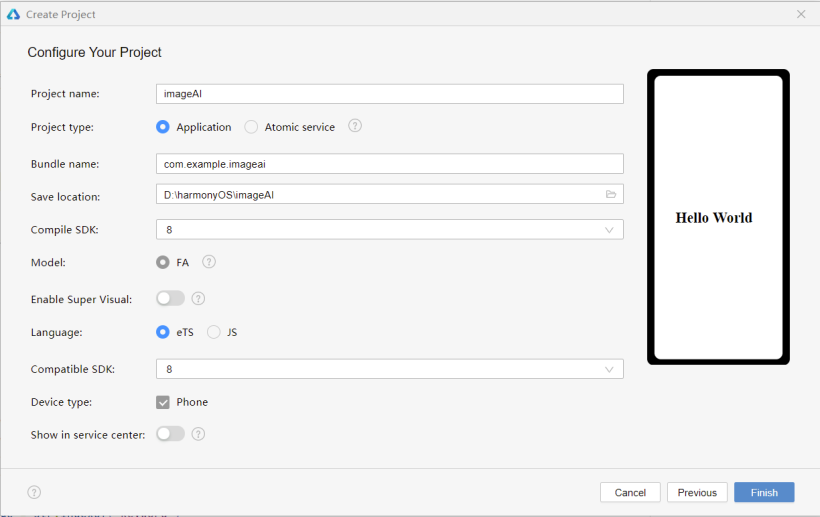
- 项目选择HarmonyOS的Empty Ability模板,API选择8,语言选择ets。
- 1、在config.json文件中添加权限。 "reqPermissions": [ { "name": "ohos.permission.INTERNET" } ] 2、在index.ets文件中导入模块,第一个是资源管理模块,第二个是网络模块。 import resourceManager from '@ohos.resourceManager';import http from '@ohos.net.http';
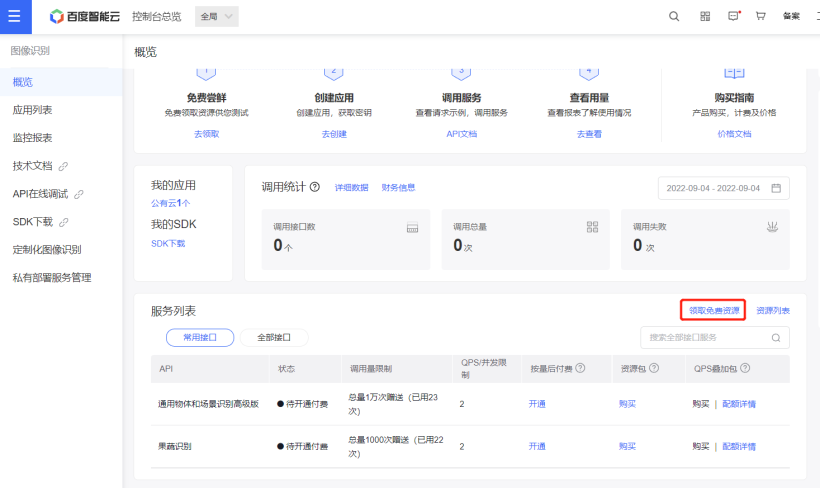
- 该API调用前需要获取access_token,具体方法见其文档(注意的是创建应用后要去开启图像识别的服务)。
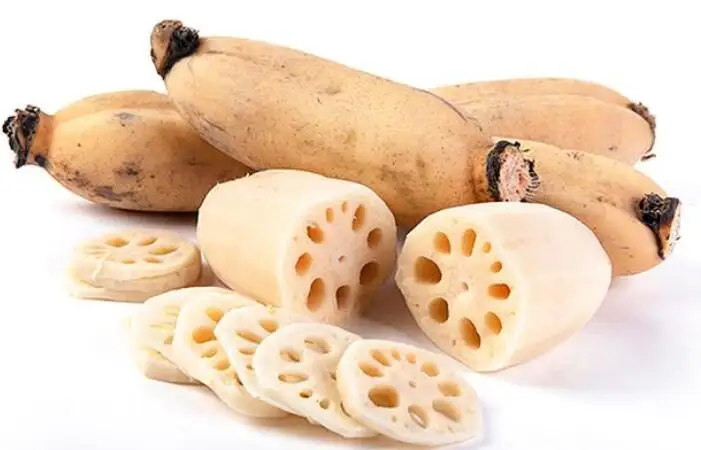
- @State access_token: string = 'Hello World' @State Base64Str: string = 'Hello World' @State result_description: string = 'description' @State result_keyword: string = 'keyword' @State result_root: string = 'root' @State result_image: string = 'image' 并上传要识别的图片到项目中,此案例中使用的是一张莲藕的图片。
- GetAccessToken() { let httpRequest = http.createHttp(); httpRequest.request(//自行替换AK和SK "https://aip.baidubce.com/oauth/2.0/token?grant_type=client_credentials&client_id=【百度云应用的AK】&client_secret=【百度云应用的SK】", { method: http.RequestMethod.POST, connectTimeout: 60000, readTimeout: 60000, }, (err, data) => { if (!err) { let obj = JSON.parse(data.result.toString()); this.access_token=obj.access_token console.info('Result1:' + data.result); console.info('Result1_token:' + this.access_token); } else { console.info('Result1_error:' + JSON.stringify(err)); httpRequest.destroy(); } }) }
- resourceManager.getResourceManager 此API只适用于FA模型,stage模型不适用。(所以在标准系统相机开发模型为stage时,不能用此方法对图片编码)。 //base64编码GetBase64(){ let that = this resourceManager.getResourceManager((error, mgr) => { if (error != null) { console.log("ResourceManager error is " + error) } else { mgr.getMediaBase64($r('app.media.lianou').id, (error, value) => { if (error != null) { console.log("base64_error is " + error) } else { console.info('base64_result:' + value) that.Base64Str = that.getCaption(value) console.info('base64Str:' + this.Base64Str) } }); } }); }//去掉编码头 getCaption(obj) { var index = obj.lastIndexOf("\,"); obj = obj.substring(index + 1, obj.length); return obj; }
- 注:这里 header:{‘Content-Type’: ‘application/x-www-form-urlencoded’} 才能传image参数到百度云。HTTP请求头字段,默认{‘Content-Type’: ‘application/json’} 。笔者将能在harmonyOS模拟器上跑起来的同样代码复制到一个新建的openHarmony项目中,但是会报错:缺参。通过后台调试发现能接收url的参数access_token和header参数,当header为默认类型时能接收到extraData里的参数,但当header为’application/x-www-form-urlencoded’时,无法收到extraData里的参数,所以初步认为是笔者所用OH系统版本的网络请求库不支持application/x-www-form-urlencoded传参。 AI_request() { let httpRequest = http.createHttp(); httpRequest.request( "https://aip.baidubce.com/rest/2.0/image-classify/v2/advanced_general?access_token="+ this.access_token, { method: http.RequestMethod.POST, header: { 'Content-Type': 'application/x-www-form-urlencoded' }, extraData: { 'image': this.Base64Str, 'baike_num': 1 }, connectTimeout: 60000, readTimeout: 60000, }, (err, data) => { if (!err) { let obj = JSON.parse(data.result.toString()); this.result_description = obj.result[0].baike_info.description; this.result_keyword = obj.result[0].keyword; this.result_image = obj.result[0].baike_info.image_url; this.result_root = obj.result[0].root; console.info('Result_description:' + this.result_description) console.info('Result_keyword:' + this.result_keyword) console.info('Result_root:' + this.result_root) console.info('Result_image:' + this.result_image) } else { console.info('Result2_error:' + JSON.stringify(err)); httpRequest.destroy(); } }) }
- 因为图片编码需要点时间,为了避免传参时出现错误,于是添加了一个延迟函数。 build() { Column({ space: 10 }) { Button('AI识别') .onClick(() => { this.GetBase64() this.GetAccessToken() setTimeout(()=>{ this.AI_request() },1400) }) Image(this.result_image) .width(150) .height(150) Row({ space: 20 }) { Text(this.result_keyword) .fontSize(20) .width(150) .height(35) .textAlign(TextAlign.Start) .margin(15) Text(this.result_root) .fontSize(20) .textAlign(TextAlign.Start) .width(150) .height(35) .margin(15) }.width('100%') .height(35) Text(this.result_description) .fontSize(20) .textAlign(TextAlign.Start) .width('90%') .height(250) } .width('100%') .height('100%') }}
- 以上就是本次的小分享啦! 想了解更多关于开源的内容,请访问: 51CTO 开源基础软件社区 https://ost.51cto.com。

原本打算在九联开发板上搭配摄像头开发,去实现拍照并对图片进行AI识别的应用开发,但是遇到了点问题。
不过基于HarmonyOS的AI图像识别案例可以正常运作,于是作此文章作为小分享O(∩_∩)O。
本案例是通过网络请求连接到百度云,调用百度云AI图像识别的API,再将结果返回至应用显示。百度云文档。
举例效果图:
项目选择HarmonyOS的Empty Ability模板,API选择8,语言选择ets。

1、在config.json文件中添加权限。
"reqPermissions": [
 {
 "name": "ohos.permission.INTERNET"
 }
 ]
2、在index.ets文件中导入模块,第一个是资源管理模块,第二个是网络模块。
import resourceManager from '@ohos.resourceManager';
import http from '@ohos.net.http';
该API调用前需要获取access_token,具体方法见其文档(注意的是创建应用后要去开启图像识别的服务)。
@State access_token: string = 'Hello World'
 @State Base64Str: string = 'Hello World'
 @State result_description: string = 'description'
 @State result_keyword: string = 'keyword'
 @State result_root: string = 'root'
 @State result_image: string = 'image'
@State Base64Str: string = 'Hello World'
@State result_description: string = 'description'
@State result_keyword: string = 'keyword'
@State result_root: string = 'root'
@State result_image: string = 'image'
并上传要识别的图片到项目中,此案例中使用的是一张莲藕的图片。
GetAccessToken() {
 let httpRequest = http.createHttp();
 httpRequest.request(
//自行替换AK和SK
 "https://aip.baidubce.com/oauth/2.0/token?grant_type=client_credentials&client_id=【百度云应用的AK】&client_secret=【百度云应用的SK】",
 {
 method: http.RequestMethod.POST,
 connectTimeout: 60000,
 readTimeout: 60000,
 }, (err, data) => {
 if (!err) {
 let obj = JSON.parse(data.result.toString());
 this.access_token=obj.access_token
 console.info('Result1:' + data.result);
 console.info('Result1_token:' + this.access_token);
 } else {
 console.info('Result1_error:' + JSON.stringify(err));
 httpRequest.destroy();
 }
 })
 }
let httpRequest = http.createHttp();
httpRequest.request(
//自行替换AK和SK
"https://aip.baidubce.com/oauth/2.0/token?grant_type=client_credentials&client_id=【百度云应用的AK】&client_secret=【百度云应用的SK】",
{
method: http.RequestMethod.POST,
connectTimeout: 60000,
readTimeout: 60000,
}, (err, data) => {
if (!err) {
let obj = JSON.parse(data.result.toString());
this.access_token=obj.access_token
console.info('Result1:' + data.result);
console.info('Result1_token:' + this.access_token);
} else {
console.info('Result1_error:' + JSON.stringify(err));
httpRequest.destroy();
}
})
}
resourceManager.getResourceManager 此API只适用于FA模型,stage模型不适用。(所以在标准系统相机开发模型为stage时,不能用此方法对图片编码)。
//base64编码
GetBase64(){
 let that = this
 resourceManager.getResourceManager((error, mgr) => {
 if (error != null) {
 console.log("ResourceManager error is " + error)
 } else {
 mgr.getMediaBase64($r('app.media.lianou').id, (error, value) => {
 if (error != null) {
 console.log("base64_error is " + error)
 } else {
 console.info('base64_result:' + value)
 that.Base64Str = that.getCaption(value)
 console.info('base64Str:' + this.Base64Str)
 }
 });
 }
 });
 }
//去掉编码头
 getCaption(obj) {
 var index = obj.lastIndexOf("\,");
 obj = obj.substring(index + 1, obj.length);
 return obj;
 }
注:这里 header:{‘Content-Type’: ‘application/x-www-form-urlencoded’} 才能传image参数到百度云。HTTP请求头字段,默认{‘Content-Type’: ‘application/json’} 。笔者将能在harmonyOS模拟器上跑起来的同样代码复制到一个新建的openHarmony项目中,但是会报错:缺参。通过后台调试发现能接收url的参数access_token和header参数,当header为默认类型时能接收到extraData里的参数,但当header为’application/x-www-form-urlencoded’时,无法收到extraData里的参数,所以初步认为是笔者所用OH系统版本的网络请求库不支持application/x-www-form-urlencoded传参。
AI_request() {
 let httpRequest = http.createHttp();
 httpRequest.request(
 "https://aip.baidubce.com/rest/2.0/image-classify/v2/advanced_general?access_token="+ this.access_token,
 {
 method: http.RequestMethod.POST,
 header: {
 'Content-Type': 'application/x-www-form-urlencoded'
 },
 extraData: {
 'image': this.Base64Str,
 'baike_num': 1
 },
 connectTimeout: 60000,
 readTimeout: 60000,
 }, (err, data) => {
 if (!err) {
 let obj = JSON.parse(data.result.toString());
 this.result_description = obj.result[0].baike_info.description;
 this.result_keyword = obj.result[0].keyword;
 this.result_image = obj.result[0].baike_info.image_url;
 this.result_root = obj.result[0].root;

 console.info('Result_description:' + this.result_description)
 console.info('Result_keyword:' + this.result_keyword)
 console.info('Result_root:' + this.result_root)
 console.info('Result_image:' + this.result_image)
 } else {
 console.info('Result2_error:' + JSON.stringify(err));
 httpRequest.destroy();
 }
 })
 }
因为图片编码需要点时间,为了避免传参时出现错误,于是添加了一个延迟函数。
build() {
 Column({ space: 10 }) {
 Button('AI识别')
 .onClick(() => {
 this.GetBase64()
 this.GetAccessToken()
 setTimeout(()=>{
 this.AI_request()
 },1400)
 })
 Image(this.result_image)
 .width(150)
 .height(150)

 Row({ space: 20 }) {
 Text(this.result_keyword)
 .fontSize(20)
 .width(150)
 .height(35)
 .textAlign(TextAlign.Start)
 .margin(15)
 Text(this.result_root)
 .fontSize(20)
 .textAlign(TextAlign.Start)
 .width(150)
 .height(35)
 .margin(15)
 }.width('100%')
 .height(35)

 Text(this.result_description)
 .fontSize(20)
 .textAlign(TextAlign.Start)
 .width('90%')
 .height(250)
 }
 .width('100%')
 .height('100%')

 }
}
以上就是本次的小分享啦!
© 版权声明
文章版权归作者所有,未经允许请勿转载。